
Table of Contents
1 Introduction and Getting Started
1.1 Introduction
1.2 Technical Support / Contact Mizuho
1.3 Getting Started in Mizuho Global e-Banking Plus
1.4 Getting To Know Your Dashboard
2 Check Image
2.1 Introduction
2.2 Advanced Filter
2.3 View and Print Check Image
2.4 Print Check List
2.5 Customization of Screen and Report
2.6 Sample Check Report And Downloadable File
3 Positive Pay
3.1 Introduction
3.2 Check Issuance
3.3 Exception Items/Suspect Items
4 Remote Deposit Capture
4.1 Introduction
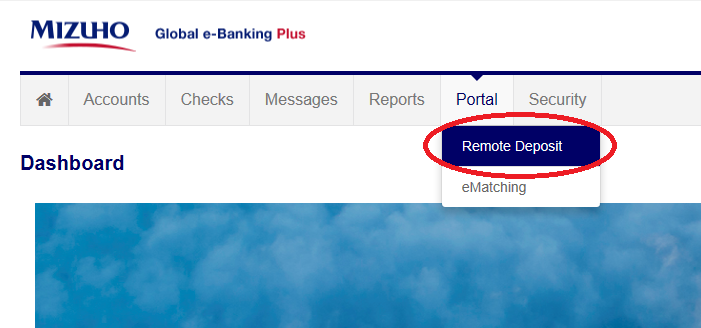
4.2 Getting Started in Remote Deposit
4.3 Scanner Setup Process
4.4 Capture Deposits
4.5 Preferences
5 Mobile Banking
5.1 Introduction
5.2 Getting Started in Mobile Banking
5.3 Positive Pay Service
5.4 Remote Deposit Capture
5.5 Revoke A Mobile Device
5.6 Change your Mobile Password
5.7 Possible Error Messages
6 Trade Confirmation
6.1 Introduction
6.2 How Trade Confirmation Works
6.3 How to Access Trade Confirmation
6.4 Getting Started with Trade Confirmation
6.5 Trade Confirmation Unconfirmed Quote
6.6 Trade Confirmation Amended/Unconfirmed Quote
6.7 Trade Confirmation Canelled Queue
6.8 Trade Confirmation Query Queue
6.9 Trade Confirmation Confirmed Queue
6.10 Trade Confirmation Search Function
6.11 Trade Confirmation Excel Download
6.12 Trade Confirmation Print
1 Introduction and Getting Started
1.1 Introduction
1.1.1 Service Overview
Mizuho Global e-Banking Plus Internet Banking is part of Mizuho Global e-Banking Cash Management Services. It consists of products designed to streamline and automate customers’ banking needs.
The following products are available in Mizuho Global e-Banking Plus Internet Banking Services.
- Remote Deposit (RDC) Allows customer to scan checks and transmit the digital image of checks to Mizuho for deposit directly.
- Positive Pay (PP) Allows customer to match issued checks against the cleared checks for detecting potential fraudulent activities.
- Check Imaging (CI) Allows customer to search, view and retrieve check image for the past one year.
- Trade Confirmation (TC) Allows customer to perform trade confirmation online.
Each of these products can be accessed by logging in with a Single Sign-On (SSO) via the Mizuho Global e-Banking website. The Single Sign-On process allows the customer to sign in once to use all or any of the products that the customer subscribes to in Mizuho Cash Management Services.
The service is available 24 hours, 7 days per week except during routine scheduled maintenance hours.
1.1.2 System Requirements
Please refer to Mizuho Global e-Banking User Guide for latest system requirement information.
1.2 Technical Support / Contact Mizuho
Mizuho offers three ways for customers to seek customer support using Mizuho Global e-Banking Plus.
1.2.1 Online Documentation
Customers will have an opportunity to search a knowledgebase for information pertaining to Mizuho Global e-Banking Plus. Users will have the ability to search and review various subjects which will assist them with any issues they may be experiencing or help answering day to day operational questions as well as some system related questions that may arise.
1.2.2 Email
Customers will have the ability to email Mizuho Technical Support (MIZUHOCash.MgmtSupport@mizuhogroup.com) questions or issues that they may be having with Mizuho Global e-Banking Plus.
1.2.3 Phone Support
Mizuho Global e-Banking Plus Technical Support phone system (866-618-3331) is available for customers to contact Mizuho Technical Support and speak with a Technical Support Representative.
1.3 Getting Started in Mizuho Global e-Banking Plus
Before a user can access Mizuho Global e-Banking Plus, the SSO User ID and initial password must be obtained from the Company Administrator.
1.3.1 Access Mizuho Global e-Banking
Login to https://otp.ffrontier.com/gcms/FFrontier to enter the Mizuho Global e-Banking website. Enter the Unit Code, User ID, Password and the One Time Password provided by the Token for login.
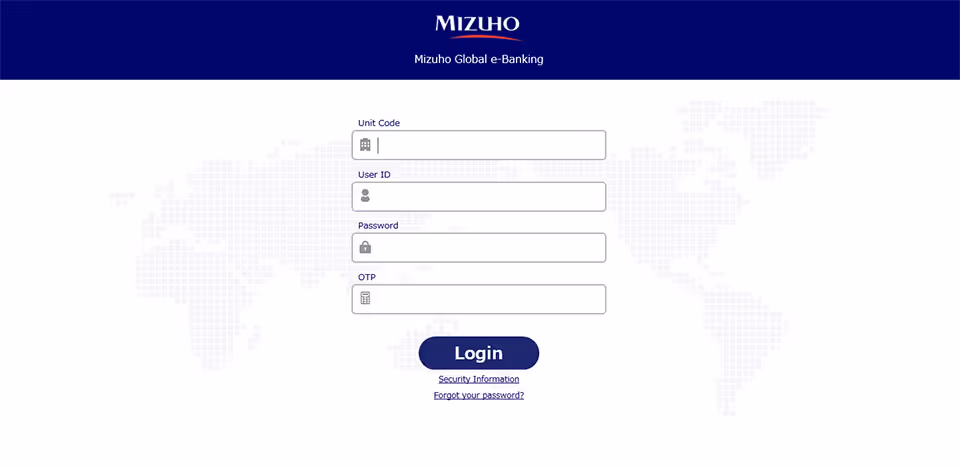
Refer to Mizuho Global e-Banking Operation Guide for complete Sign-On instruction.
1.3.2 Accessing To Mizuho Global e-Banking Plus
To access Global e-Banking Plus, click “Logon to Local Services” to view your link to Global e- Banking Plus.
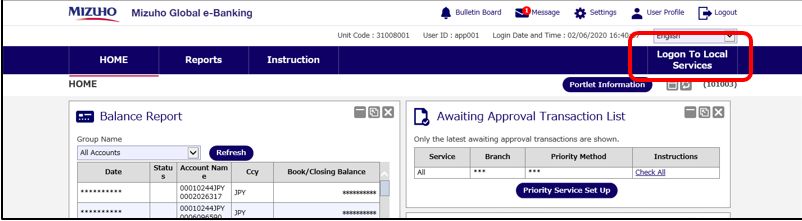
To access Global e-Banking Plus, click “Logon to Local Services” to view your link to Global e- Banking Plus.
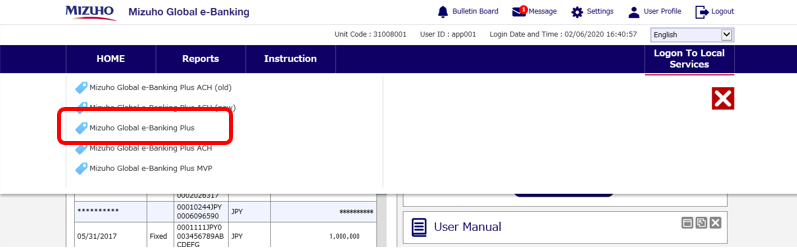
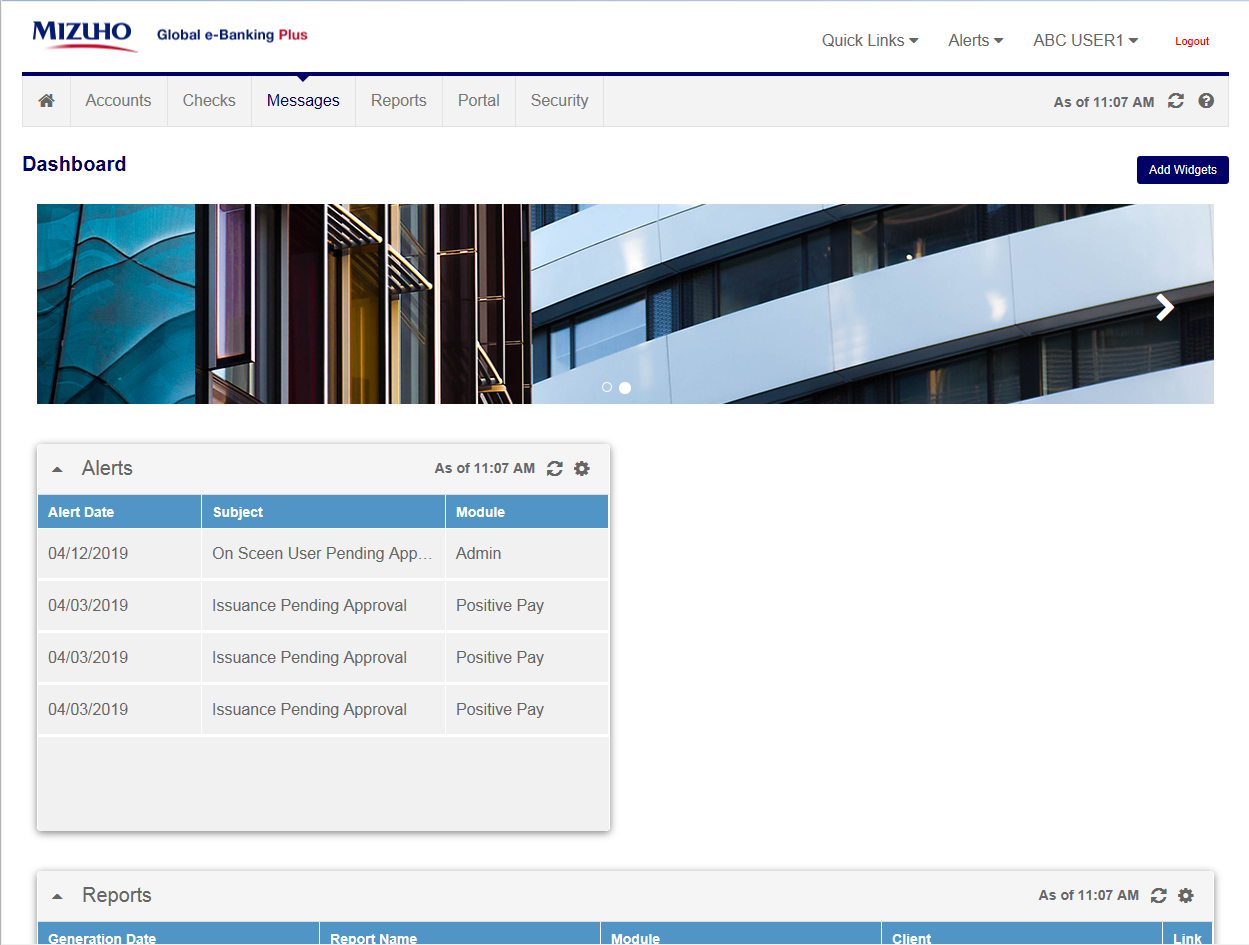
Mizuho Global e-Banking Plus home screen.
1.4 Getting To Know Your Dashboard
1.4.1 Widgets
Widgets create shortcuts to access information on your dashboard. You can add widgets by clicking the “Add Widgets” button on the top right corner of your home screen.
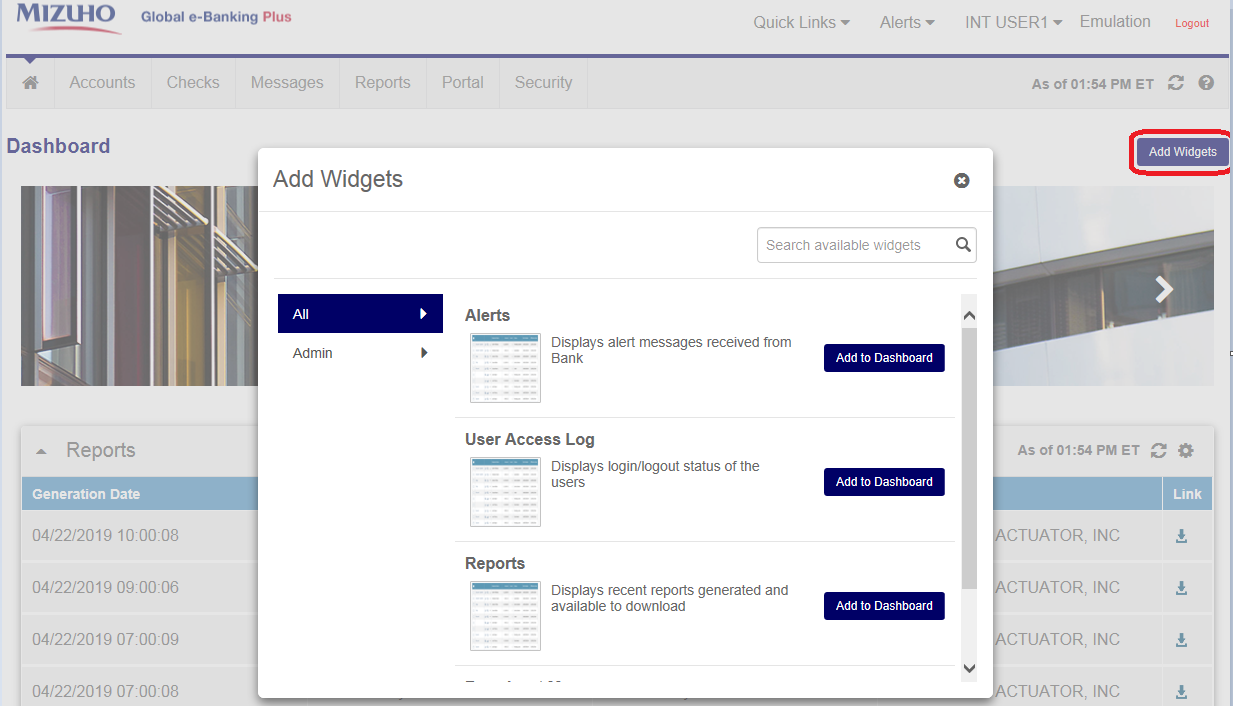
There are four widgets you can add or remove from your dashboard.
- Alerts The Alerts widget displays alert messages received from the bank.
- Broadcast Message The Broadcast Message widget lists the announcements received from the bank.
- Reports The Reports widget lists the Pre-generated reports for various services.
- User Access Log The User Access Log widget displays all the users that are currently logged in.
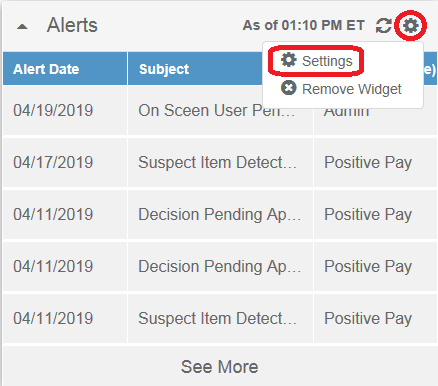
To remove a widget, click the gear icon on the widget and click “Remove Widget”.

You are able to configure the widget to your liking by clicking the gear icon on the widget and clicking “Settings”.
1.4.2 Alerts
Alerts are messages from the bank to advise you of an action. Alerts are sent via e-mail and they also appear on screen for the user. You can access your on screen alerts by clicking the alerts drop down menu on the upper right side of the webpage.

You can also view on screen alerts from the Alerts widget.
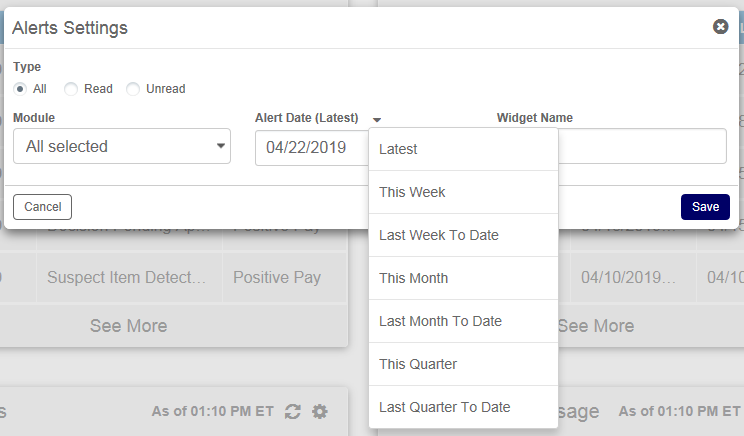
You are able to filter which alerts to be displayed on the widget and rename the widget.
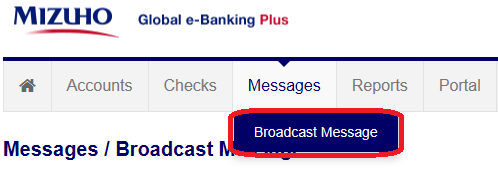
1.4.3 Broadcast Messages
Broadcast messages are announcements from the bank advising users of maintainance, any known issues or updates customers should be aware of.
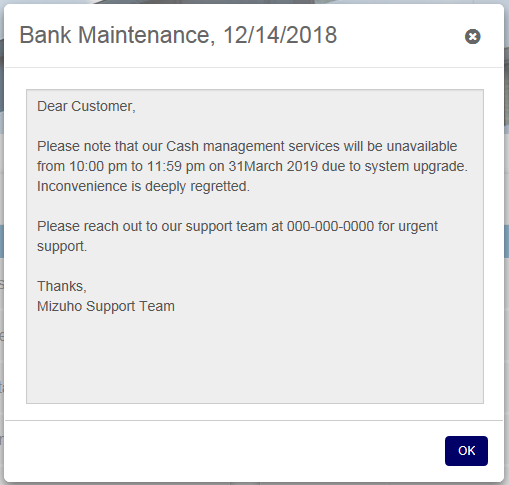
You can access your broadcast messages by clicking on the “Messages” tab then clicking “Broadcast Message”.
You can also view broadcast messages from the Broadcast message widget.
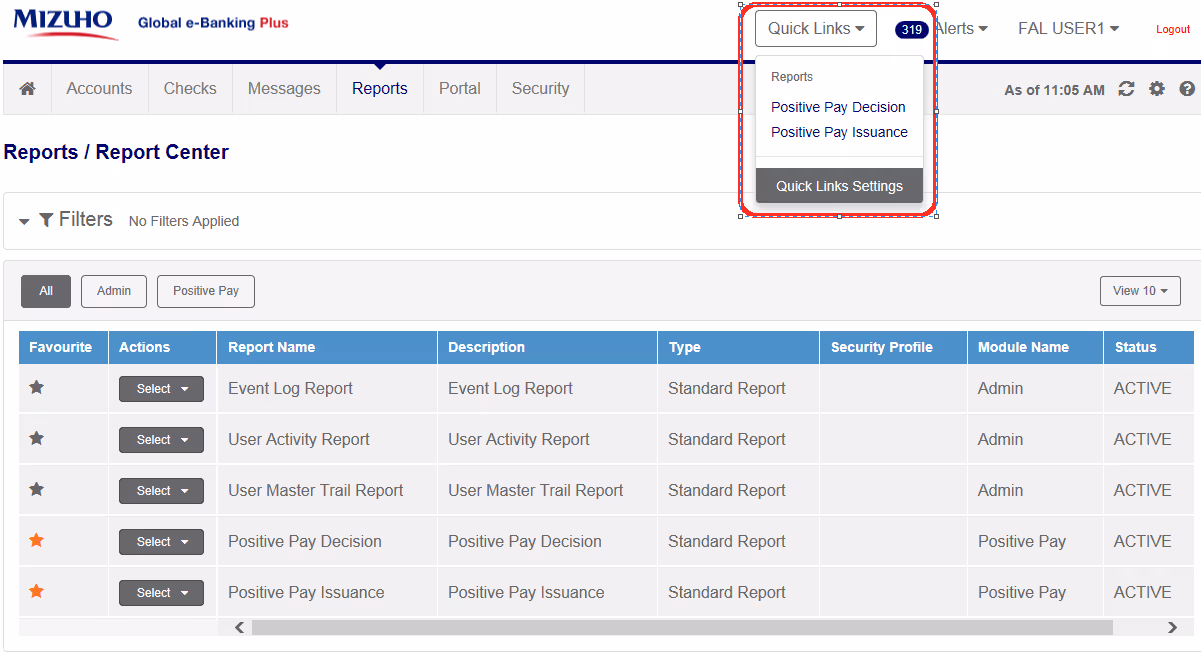
1.4.4 Quick Links
Quick links grant quick access to favorite reports. The Quick Links menu is empty until a user favorites a report. To mark a report as a favorite, click the star to the left of the report while in the Report Center. Once the the report is favorited, a “Preferences Saved Successsfully” pop up will appear.
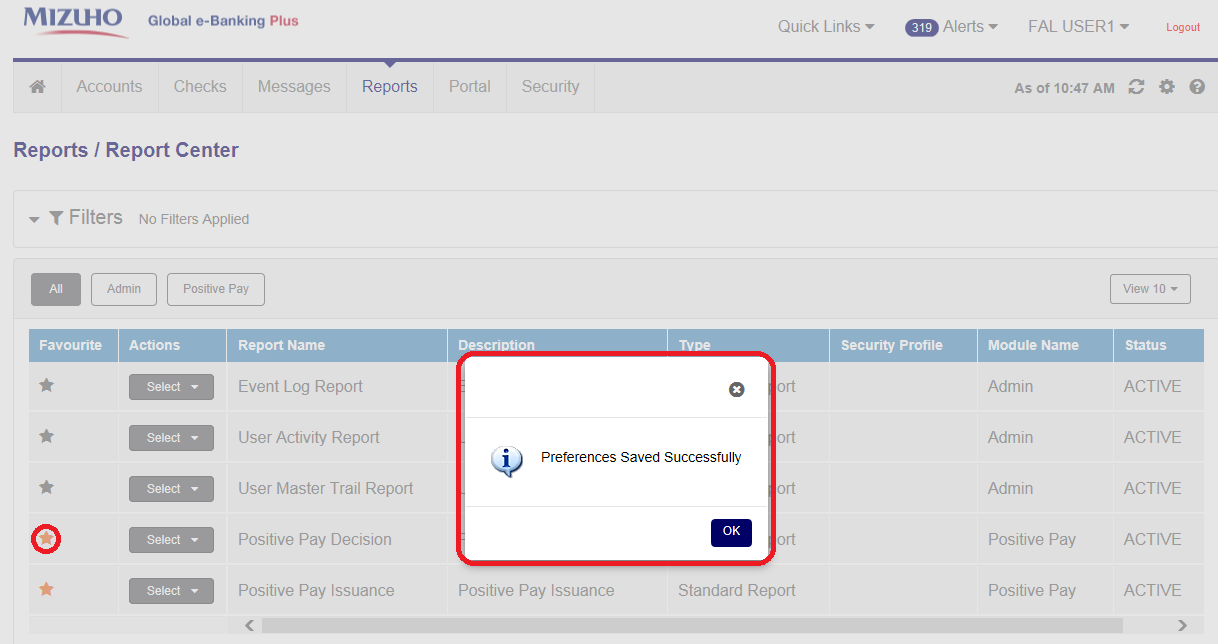
Refresh the page after the favorite reports are saved, users will then be able to view the reports under the Quick Links dropdown menu.
1.4.5 Creating/Changing Your Mizuho Global e-Banking Plus Password
Mizuho Global e-Banking Plus users do not use a password to login to the desktop website. However, if users sign up for mobile banking, they will need a password to login into their mobile device. In order for users to create a password on their own, they will have to contact Technical Support to generate an initial password. When users receive the new password e-mail from Technical support, they can change their password by clicking on their username and clicking “Change Password”.

Password must be 8 or more characters, and it requires at least 1 letter and 1 number.
1.4.6 Help and More
At the top right of any screen, there is a time stamp  letting users know that the information they are viewing on the page is up to date as of the time on the stamp. To the right of the time stamp is the refresh icon
  , which allows the user to refresh the page and update the time stamp to the current time. The gear icon
  allows users to adjust the table and columns on the page. The help document icon
  is located to the right of the gear icon.

2 Check Image
2.1 Introduction
Check Image service provides clients the access to their cleared check images, check report and reprint check images for up to one year.
2.2.1 Service Overview
Check Image in Mizuho Global e-Banking Plus enables client users to view information related to cleared checks and the corresponding images.
The service is available 24 hours, 7 days per week except during routine scheduled maintenance hours.
2.2.2 Getting Started in Check Images
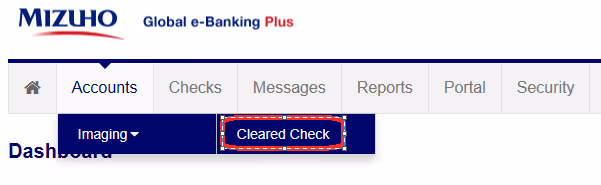
Once you are logged into Global e-Banking Plus, click on the “Account” tab to access “Imaging” then “Cleared Checks”. Imaging service allows user to view the cleared check information.
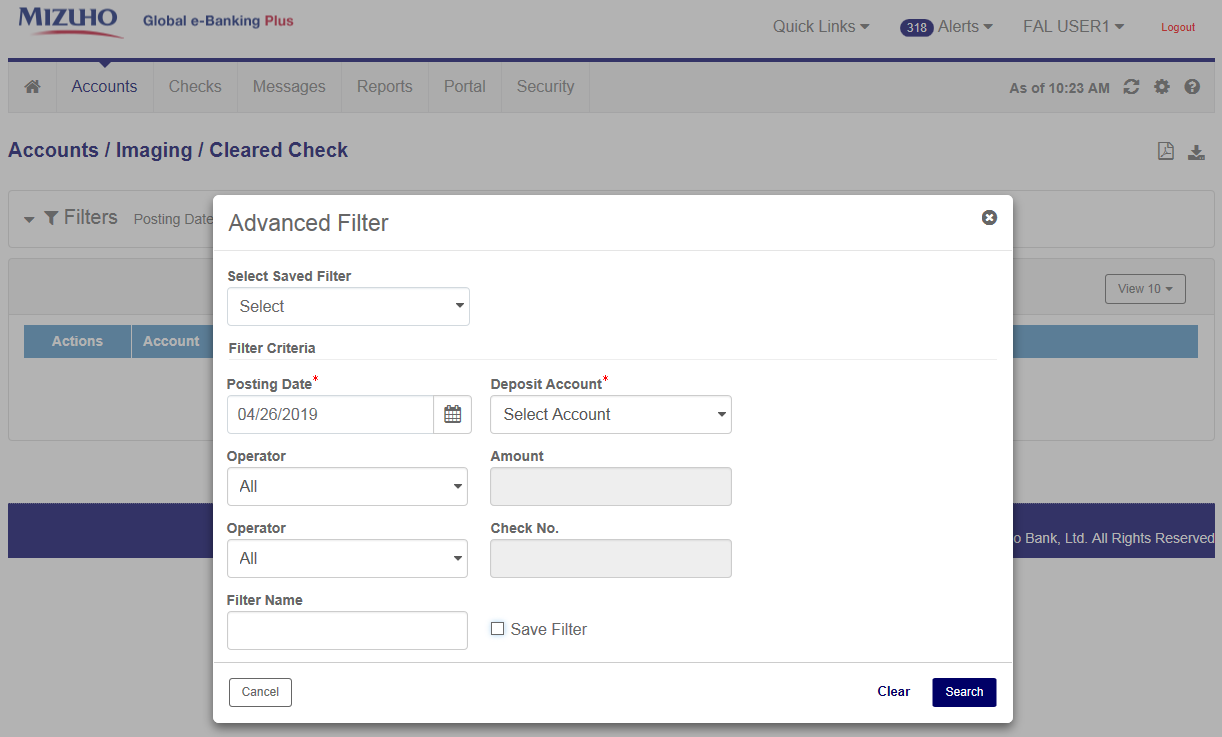
The first thing that users will see when they enter the “Cleared Check” tab is the advanced filter.
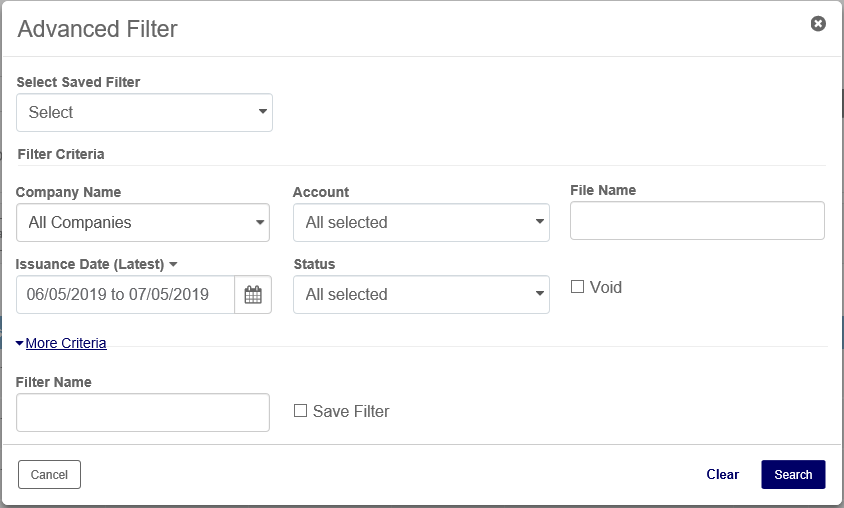
2.2 Advanced Filter
The “Advanced Filter” allows the user to filter by Deposit Account*, Posting Date*, Deposit Amount, and Serial Number. The user can also create and save custom filters for later use.
2.2.1 Refined Search
Users can narrow the search by using the operators to specify if the amount is equal to, less than, greater than, or between the entered amount(s).
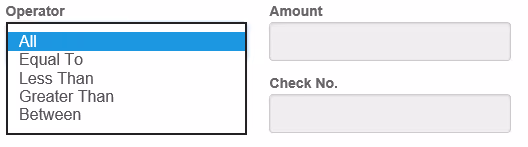
Users can also search for a specific check or a check range by choosing the “Check No.” operators.

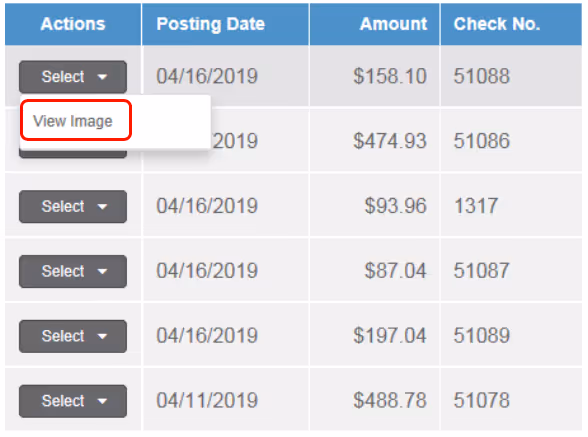
Once the filter is applied, the page will display the check(s) that meet the searching criteria. To view the check image, click on the “Select” button for dropdown menu and click “View Image”.
2.3 View and Print Check Image
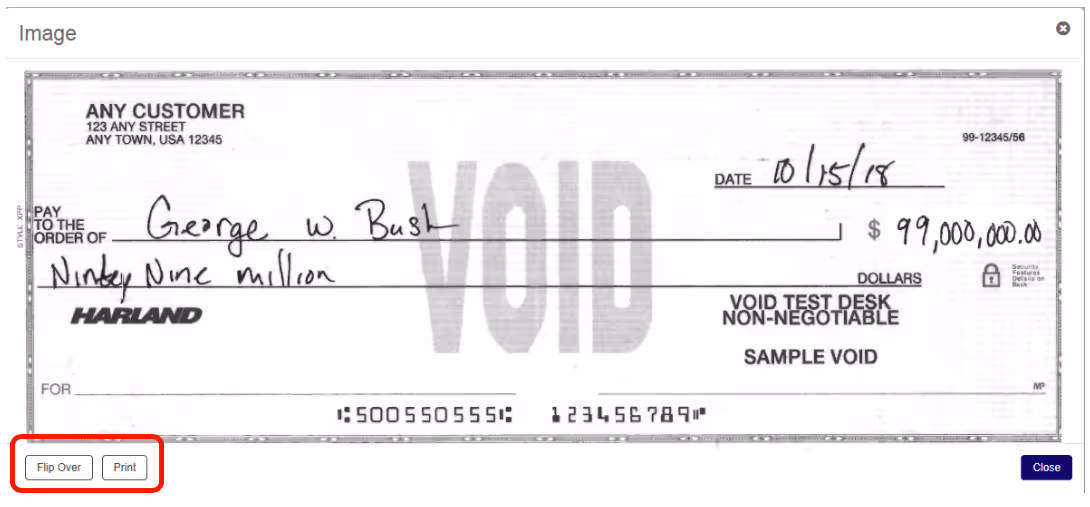
Users are able to view and print the front and back of the check image. When done viewing the check image, click “Close” or the X button to close the image.
2.4 Print Check List
Users can generate a report in PDF format or any downloadable format for the checks listed on screen. Clicking the PDF icon will generate a PDF report for checks listed on screen. Clicking the Download icon will generate .xls, .csv or .tsv format file.

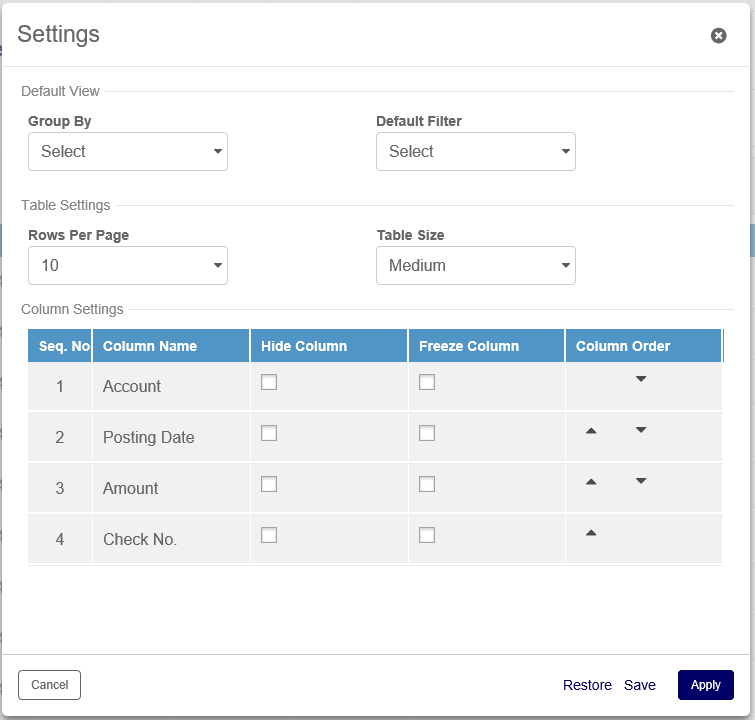
2.5 Customization of Screen and Report
Users can further customize their report by clicking the gear icon and changing the table settings. From this page users can change their default filter, table settings and column settings.
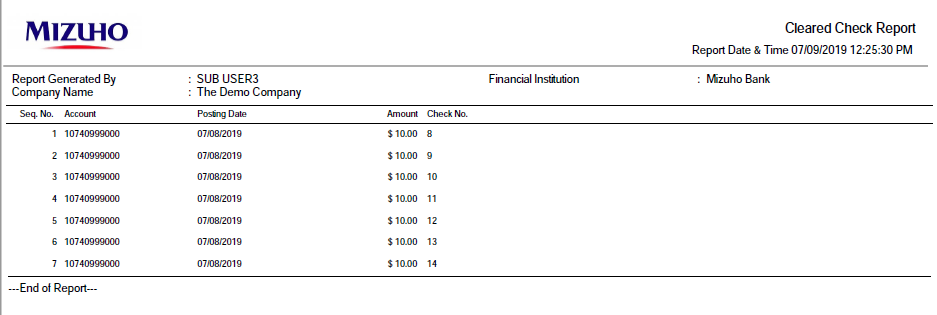
2.6 Sample Check Report And Downloadable File
2.6.1 Sample Cleared Check Report
2.6.2 Sample Downloadable File
3 Positive Pay
3.1 Introduction
3.1.1 Service Overview
Positive Pay Service is a Web-based application that enables Mizuho customers to manage checks clearing through customer’s business accounts. Positive Pay provides an effective fraud control method to identify discrepancies between checks issued by Mizuho customers and the checks presented to Mizuho Bank.
The benefits of using Positive Pay Service includes:
- Detects altered or fraudulent checks when check is presented
- Allows customer to view suspect check image
- Provides customer the option to accept or reject suspect checks
The service is available 24 hours, 7 days a week except during routine scheduled maintenance hours.
3.1.2 Getting Started In Positive Pay
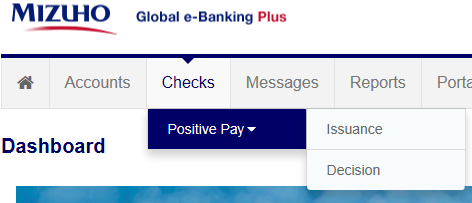
Once you are logged into Mizuho Global e-Banking Plus, click on the “Checks” tab to access “Positive Pay” service. Positive Pay has two major components, “Issuance” and “Decision”.
3.2 Check Issuance
There are two methods to create an issuance using Mizuho Global e-Banking Plus.
3.2.1 Manual Issuance Creation
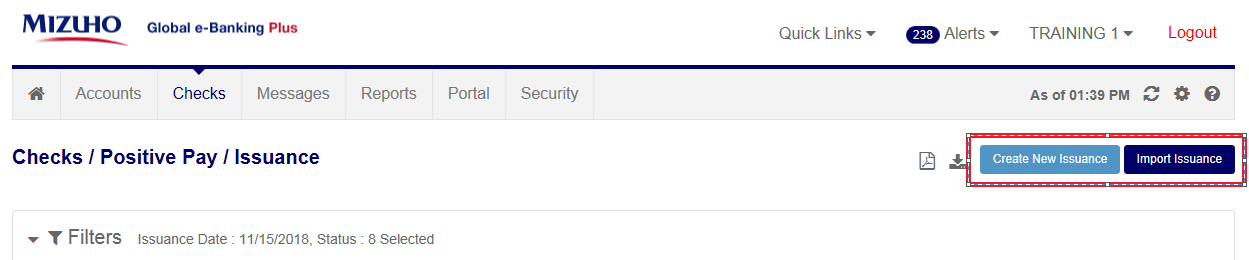
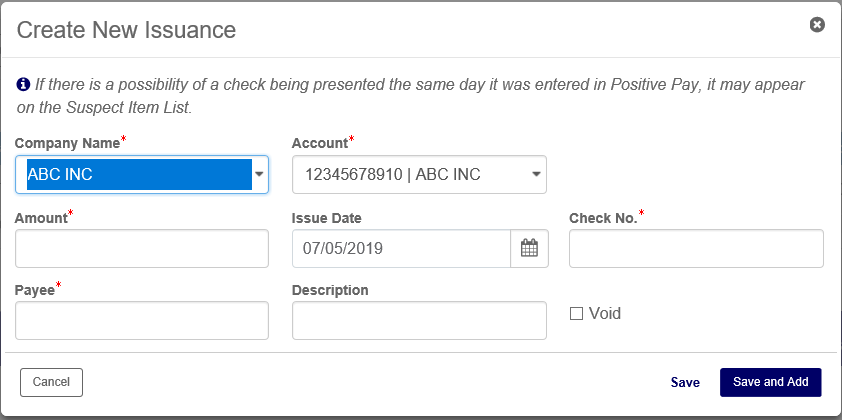
To create a manual issuance, click “Create New Issuance” and the below window will pop up. Enter the Company Name, Account #, Amount, Issue Date, Check #, and Payee. To add multiple checks, click “Save and Add” to enter the next issuance. Depending on whether approval is required, the issuance may follow a maker/checker workflow system. After the issuance is added to the system, it is stored in Mizuho Global e-Banking Plus for 215 days.
Field names with * next to it indicate a mandatory field. If “Void” field is selected, only the “Check No.” will be mandatory.
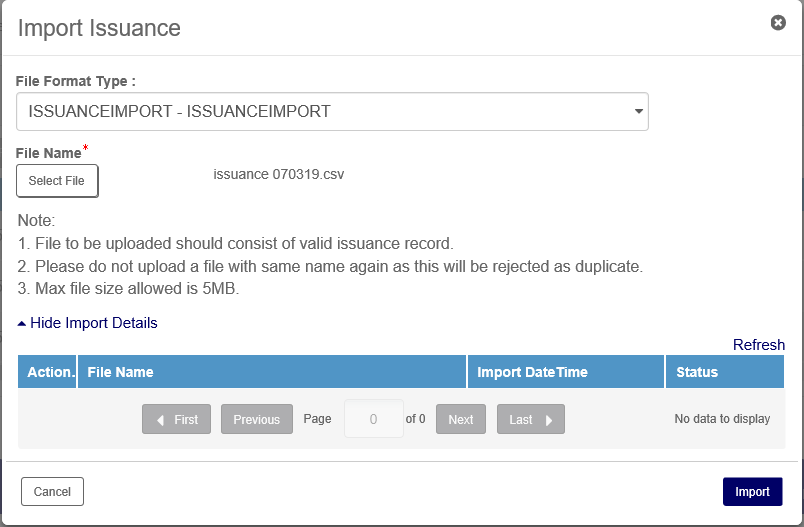
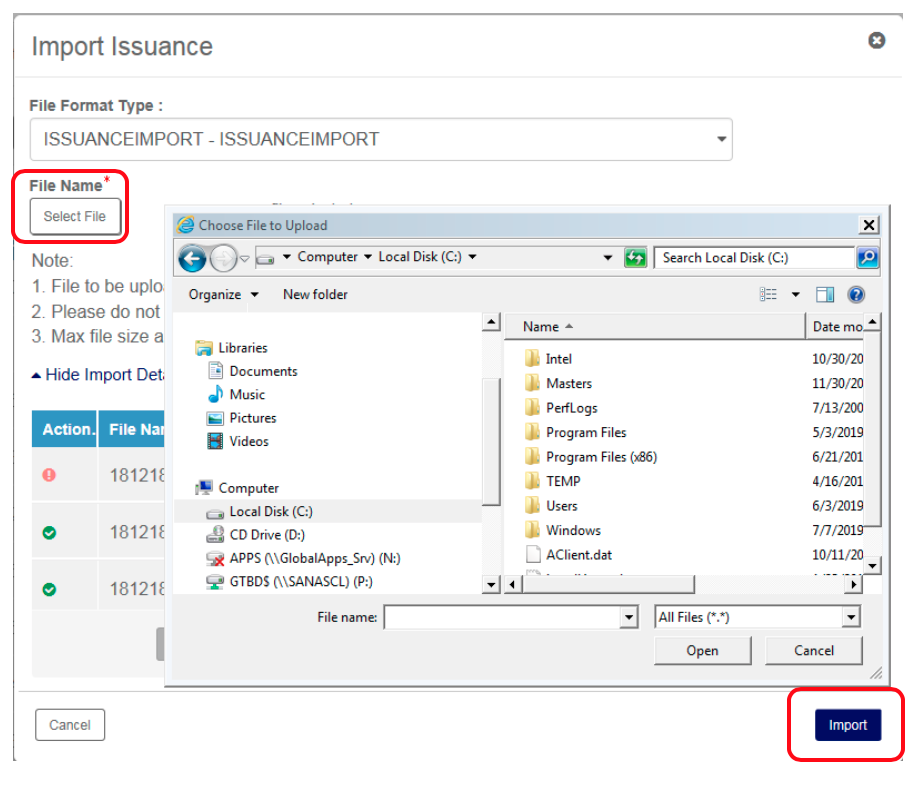
3.2.2 Import Issuance File
To import an issuance file, click “Import Issuance” and the below window will pop up. Users will select a file to be uploaded. Please note the issuance file must be in .csv format. The issuance file cannot be more than 5MB. Users cannot upload two files with the same name; the second one will be rejected as a duplicate. After the issuance data is imported to the system, it is stored in Mizuho Global e-Banking Plus for 215 days.
3.2.3 How To Setup An Issuance File
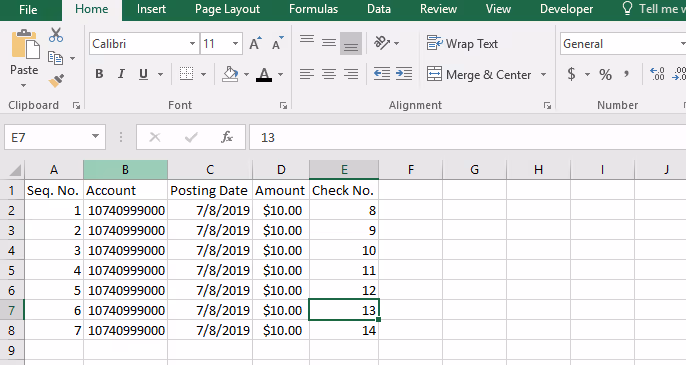
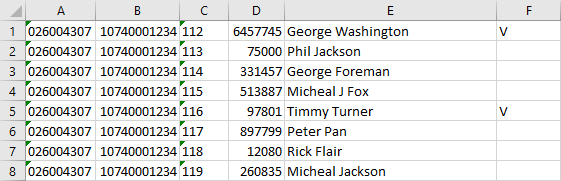
An issuance file should contain the following fields for each issuance record.
1. ABA NUMBER: The full 9 digit ABA number including leading zeros.
2. ACCOUNT NUMBER: A vaild account number registered for the Positive Pay service.
3. CHECK NUMBER: Must be unique. No duplicate check numbers can be used.
4. AMOUNT: Must be entered without decimals (ex. “$140.58” should be entered as “14058”).
5. PAYEE NAME: Must be entered exactly as it appears on the check. Must be enclosed in double quotes if the payee name includes commas (ex. “ABC, Inc.” Valid Special Characters are @ $ & ( ) - _ :. Invalid Special Characters are ~ ! # % ^ * = + \ | ; ? < > { } [ ] /).
6. VOID (optional): To issue a void item, enter a capital “V” in the last column. If you do not wish to void an issuance, simply leave the column blank. When void is selected, the Amount and Payee Name fields can be optional.
Example of Issuance File in Excel:

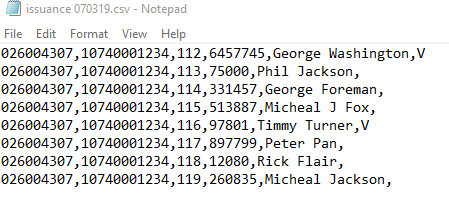
Example of Issuance File in NotePad:
Once the issuance file is created, click on “Select File” to select your issuance file, then click the “Import” button to the bottom right of the “Import Issuance” pop-up screen.
After you click import, a message will appear stating “File received successfully. Please click refresh for updated status.”

After clicking “Ok” the file will appear in a “New” status.
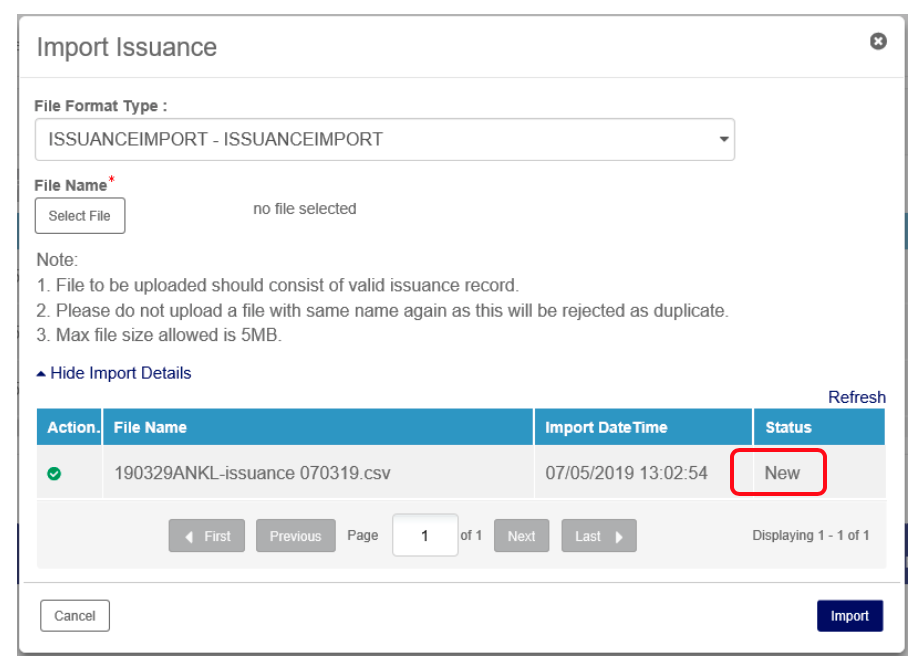
To see the final status of the file, click “Refresh” above the “Status” column. If the file was uploaded successfully the status will be updated to “Completed”.

If the file did not upload successfully, the status would be updated to “Error”.

To review the error with the file, click on the red  icon, the “Reject Repair Report” will be generated and will display the reasons the file was rejected.
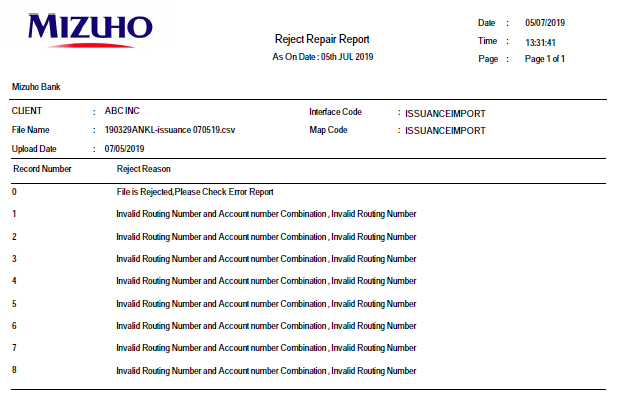
After viewing the report, make the necessary corrections and rename the file. Then repeat the import process.
Notes:
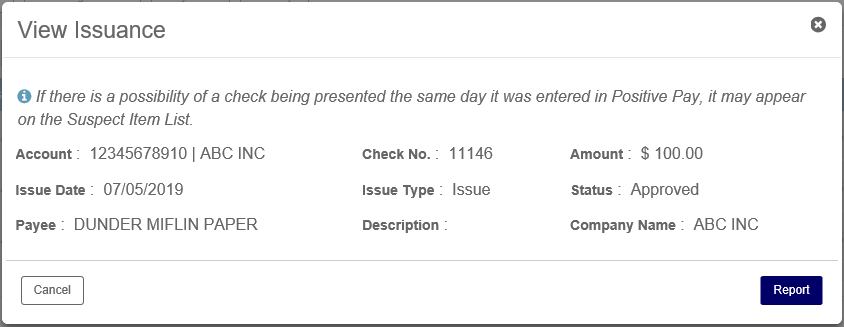
1. If there is a possibility of a check being presented the same day it was entered in Positive Pay Issuance table, it may appear on the Suspect Item List.
2. Payee name field matching is limited to the first 49 characters.
3.2.4 Submitting Issuance
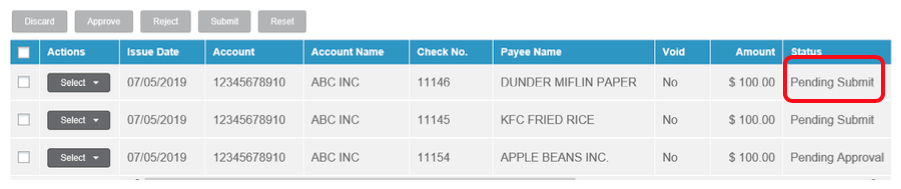
After creating an issuance, the issuance goes into a “Pending Submit” status.

While issuances are in “Pending Submit” status, the record can be modified, discarded, or submitted. Modifing a record allows you to change or add to the information previously entered. Discarding a record will completely erase the record. Submitting a record saves the record. Issuances must be submitted in order for the data to be processed.
You can modify, discard or submit an issuance by clicking “Select” on the “Actions” tab and clicking on the action you would like to take.

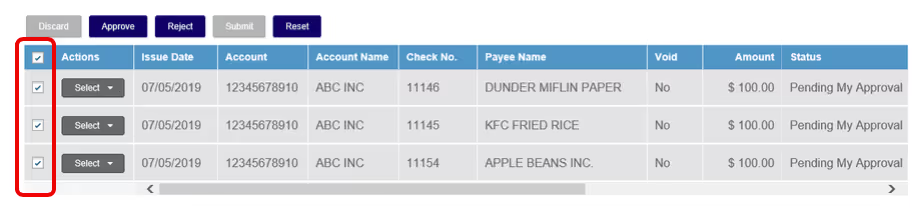
If you need to submit or discard multiple records, click on the box to the left of each record you want to submit or discard, then click on the “Submit” or “Discard” button on top of the issuance.

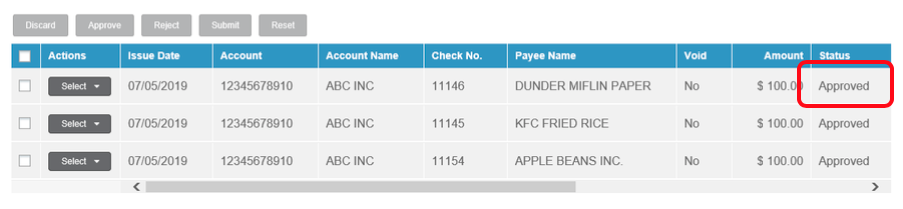
After submitting the issuance, the record will either be in “Approved” or “Pending Approval” status depending on your company’s approval setting. The user which submitted the item can no longer edit the item once it is in “Approved” or “Pending Approval” status, the item can only be reset.
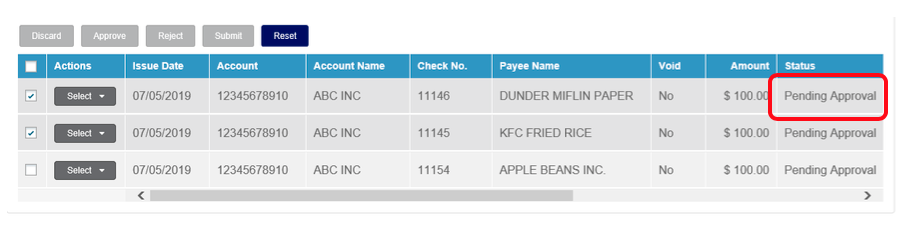
Resetting a record brings the record back to a “Pending Submit” status.
3.2.5 Approving And Rejecting Issuance
Issuances cannot be approved by the user who submitted the record. Issuance must be approved by another user. Users who can approve the issuance will see the record in a “Pending My Approval” status.

To approve or reject an issuance record, click the “Select” button on the “Actions” column and click the action you would like to take.
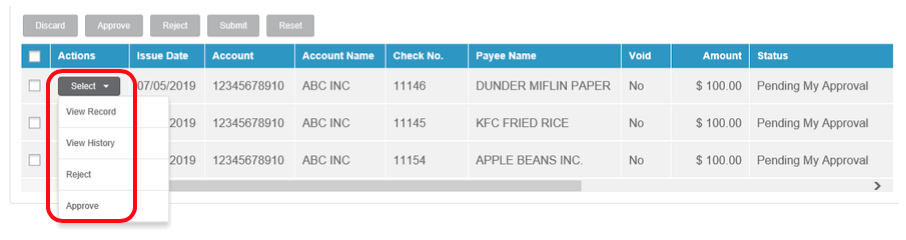
From this menu users can view the issuance, which can help the users decide if they want to approve or reject the item.
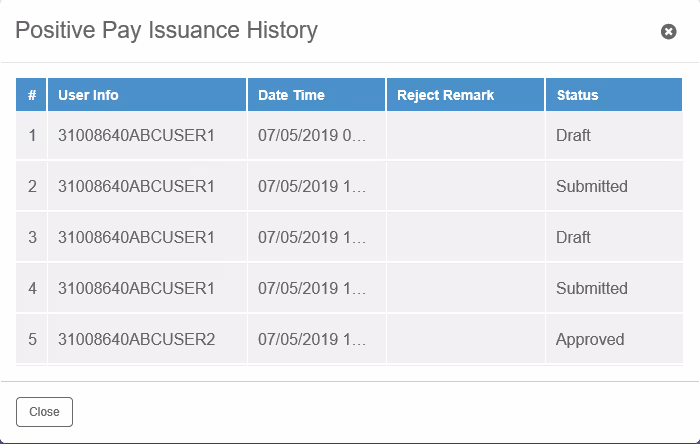
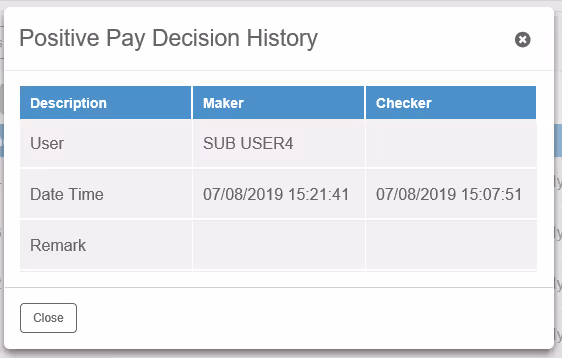
Users can also view the history of the record from this menu. Viewing the history shows who created the record and who approved it.
Similar to submitting a record, if you need to approve mulitple records, check the box to the left of each record you want to approve.
After approving the record, the issuance will be in an “Approved” status.
Important Notes:
• Users are able to reset an approved record until the upcoming 4:00AM (EST). After 4:00AM the record will be locked and be transferred to our processing system.
• Base on the 4:00AM Issuance transferring cycle, checks presented on the current date would appear as suspect items if the issuances were created after 4:00AM.
• Payee name field matching is limited to the first 49 characters.
3.2.6 Filters
Users are able to filter the issuance table by using the “Advanced Filter” function.
Users can also filter by using the “Group By” buttons. The “Group By” buttons allow users to quickly fliter by status.

3.2.7 Positive Pay Issuance Detailed Report
The “Positive Pay Issuance Detailed Report” can be generated by clicking the  PDF icon on the top right of the positive pay issuance screen. You can also export the report as .csv, .xls or .tsv file by clicking the export icon
  .
.
.

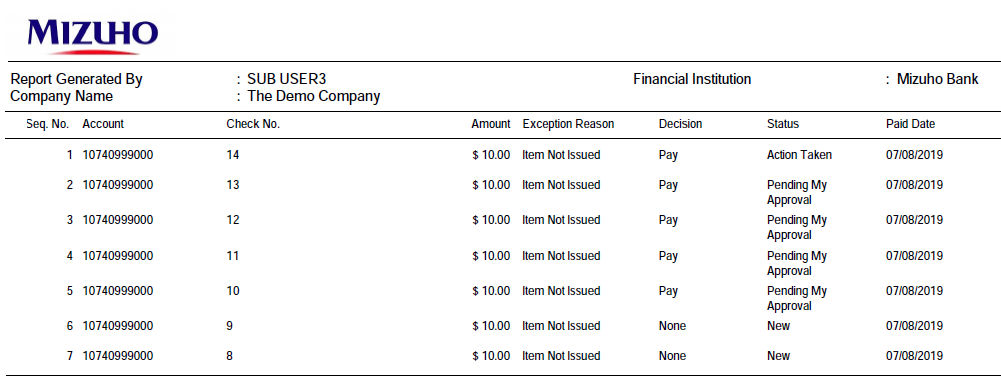
“Positive Pay Issuance Detailed Report” shows all fields available from the issuance page.
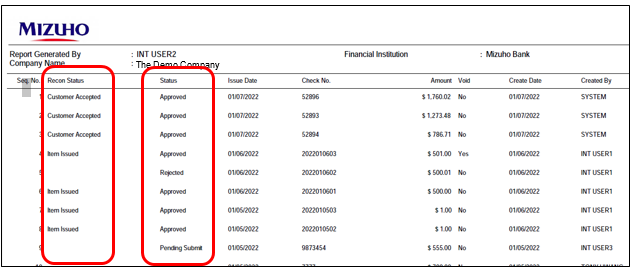
The “Status” column shows the current status of the issuance. The “Recon Status” column shows the current status of the positive pay comparing process. This information can be used for reconciling with your internal accounting system.
3.3 Suspect items
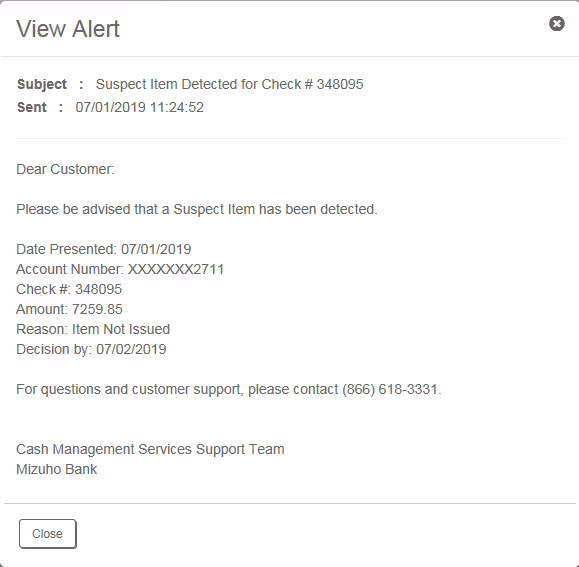
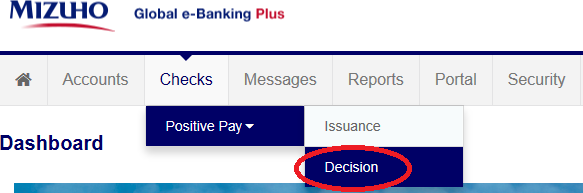
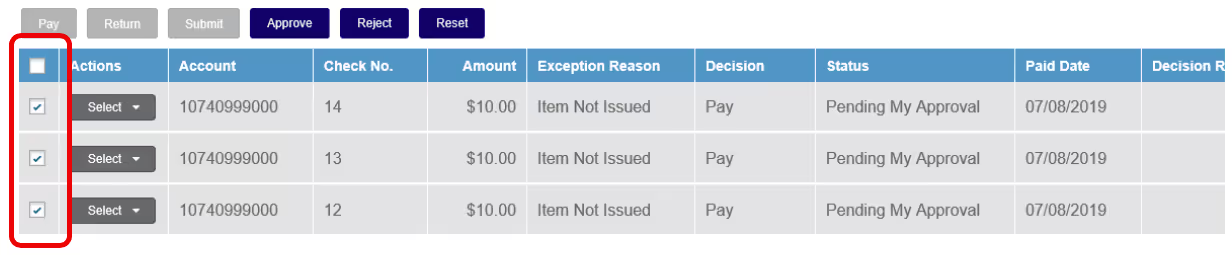
A suspect item is any check presented to pay without a matching issuance. You can view all of the suspect items by clicking “Decision” under the “Positive Pay” dropdown menu.
Users can decide to pay or return a suspect item. Decisions must be made no later than 11:00AM (EST) on the next business day. If decisions are not made by 11:00AM, the items will be processed according to your default decision.
3.3.1 Making A Decision
To make a decision on a suspect item, check the box next to the suspect item record, then choose “Pay” or “Return”.

If you choose to pay, the record goes into the “Decision Pending Submit” status. If you choose to return, you must select a “Decision Reason”.
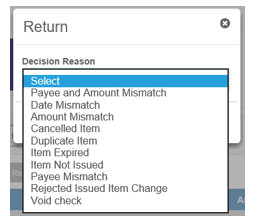
Once the reason is selected, the record goes into the “Decision Pending Submit” status.

While suspect items are in “Decision Pending Submit” status, the record can be submitted or reset. Submitting a record saves the decision. Resetting a record allows you return the record to the previous status.

If you need to submit several decisions at once, click on the box to the left of each record you want to submit, then click on the “Submit” button on top of the suspect items list.
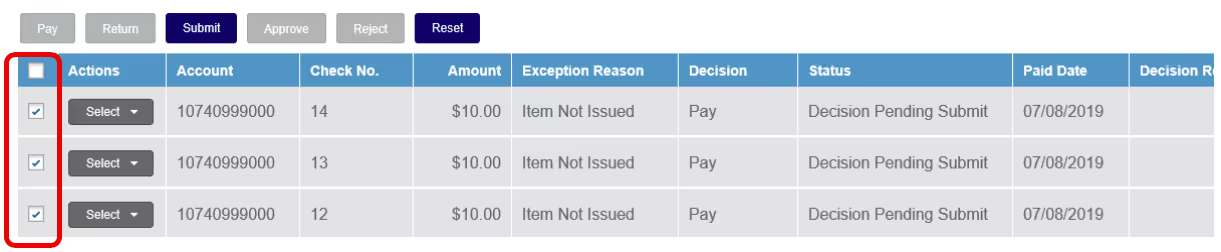
After submitting the decision, the suspect item will either be in “Approved” or “Pending Approval” status depending on your company’s approval setting. The user which submitted the item can no longer edit the item once it is in “Approved” or “Pending Approval” status, the item can only be reset.
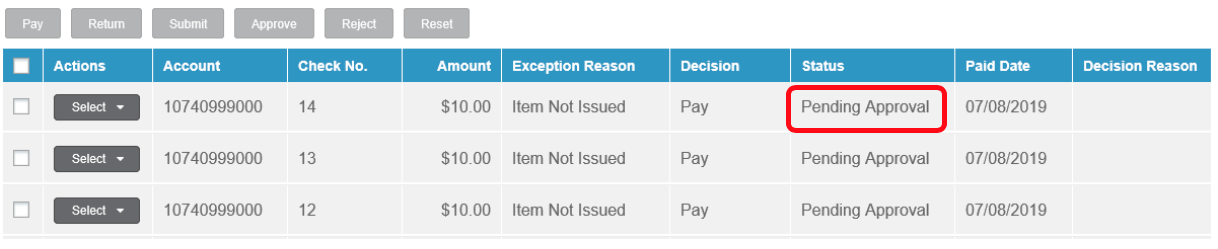
Resetting a decision brings the suspect item back to the “New” status.

3.3.2 Approving And Rejecting A Suspect Item
Suspect items cannot be approved by the user which submitted the decision, it must be approved by another user. Users which can approve the suspect items will see the record in a “Pending My Approval” status.

To approve or reject a suspect item, click the “Select” button on the actions column and click the action you would like to take.
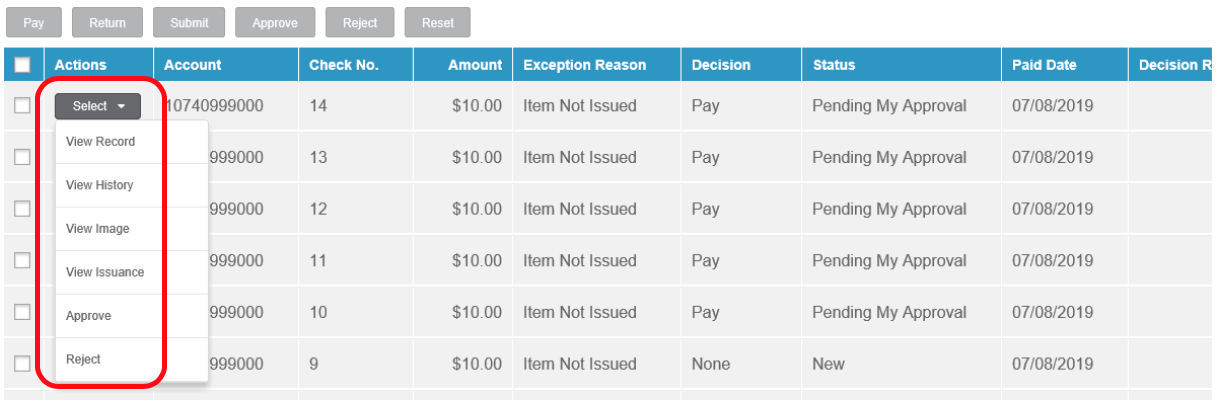
From this menu, users can view the check image, the issuance, and the suspect items record, which can help the user decide if they want to approve or reject the record. Users can also view the history of the record. Viewing the history shows who made the decision and who approved it.
Similar to submitting a decision, if you need to approve mulitple records, check the box to the left of each record you would like to approve.
After approving the decision, the suspect items will be in an “Action Taken” status.

Users are able to reset approved decisions until 11:00 AM (EST) on the following business day. If decisions are not approved by 11:00 AM, any suspect items will be processed according to your default decision.

3.3.3 Positive Pay Decision Report
The Positive Pay Decision Detailed Report can be generated by clicking the PDF icon on the positive pay decision screen. You can aslo export the report as a .csv, .xls or .tsv file by clicking the export icon.
4. Remote Deposit
4.1 Introduction
4.1.1 Service Overview
Remote Deposit Capture (RDC) service is a Web-based application that enables businesses to make electronic deposits from their desktop using a bank-approved scanner or with a supported mobile device. The users can scan and capture images and MICR data of U.S. dollar items drawn on U.S. banks and transmit that data to Mizuho using a secure Internet connection.
The benefits of using Remote Deposit Capture Service include:
• Increased funds availability
• Eliminate paper deposits
• Potential to reduce number of associated fees
• Transmitting electronic data from your location eliminates transportation expenses and time associated with couriers services
• The service allows users to search and create reports for up to 45 days. The check image is retained for up to 14 days.
The service is available 24 hours, 7 days per week except during routine scheduled maintenance hours.
4.1.2 System Requirement
Please refer to Mizuho Global e-Banking User Guide for system requirement information.
To support the scanner operation, customer should have a computer with the following minimum configuration.
Table 4-1: Minimum System Requirements
4.2 Getting Started in Remote Deposit Capture
Refer to Mizuho Global e-Banking Plus Introduction and Getting Started User Guide for logging in to Mizuho Global e-Banking services.
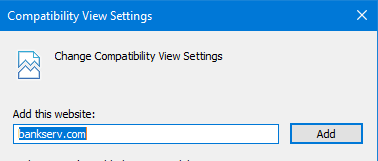
Before accessing the Remote Deposit function, add “Bankserv.com” to your compatibility view under Internet Explore Settings.
Enter the Remote Deposit portal to begin scanning your deposit.
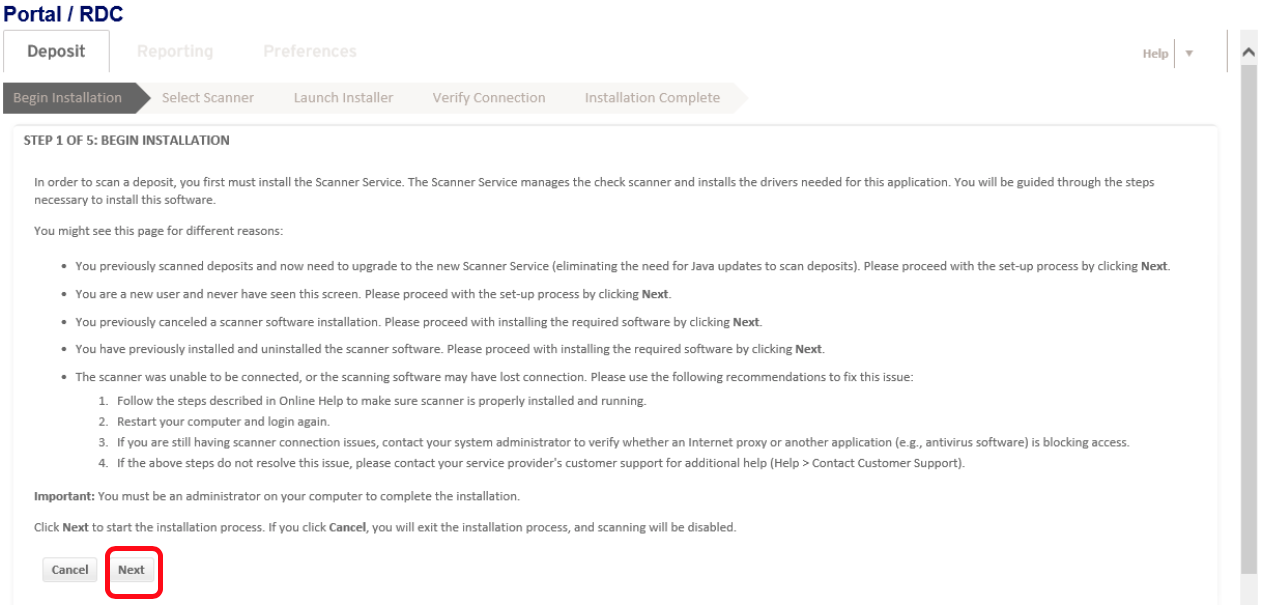
4.3 Scanner Setup Process
In order to scan a deposit, user must perform the scanner service installation. The Scanner Service manages the check scanner and installs the drivers needed for this application. You will be guided through the steps necessary to install this software. If a user has not installed service yet, the Portal will prompt users to install their scanner. It is a five step process.
Important: You must be an administrator on your computer to complete the installation.
Step One: Begin Installation. Click “Next” to begin the installation.
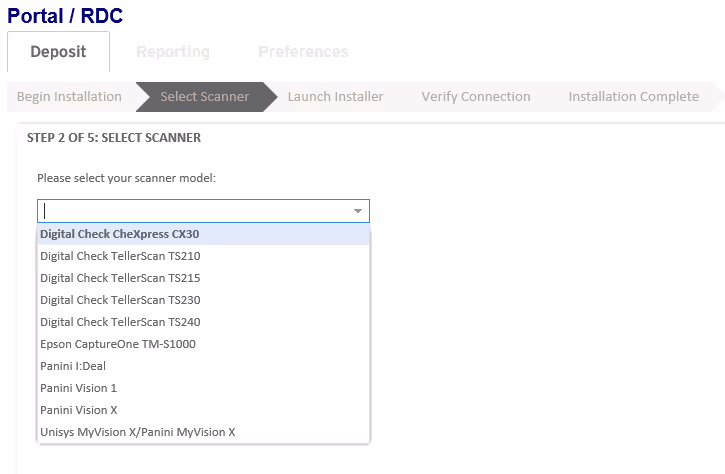
Step Two: Select Scanner. Find your scanner on the drop down menu. Once your scanner is selected click “Next”.
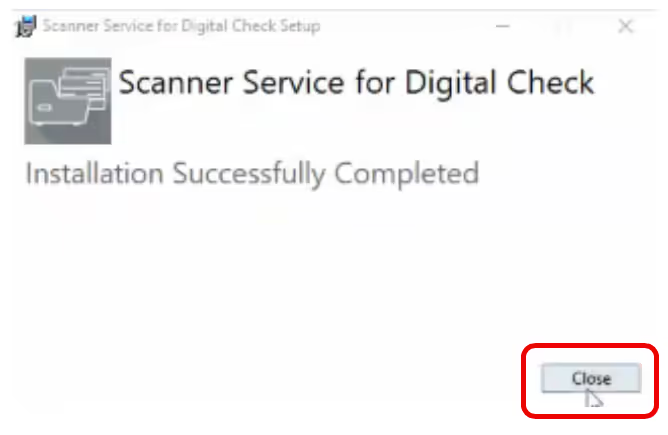
Step Three: Launch Installer. Click the link to download the installer. When the installer is downloaded, click on the file and select “Run”.
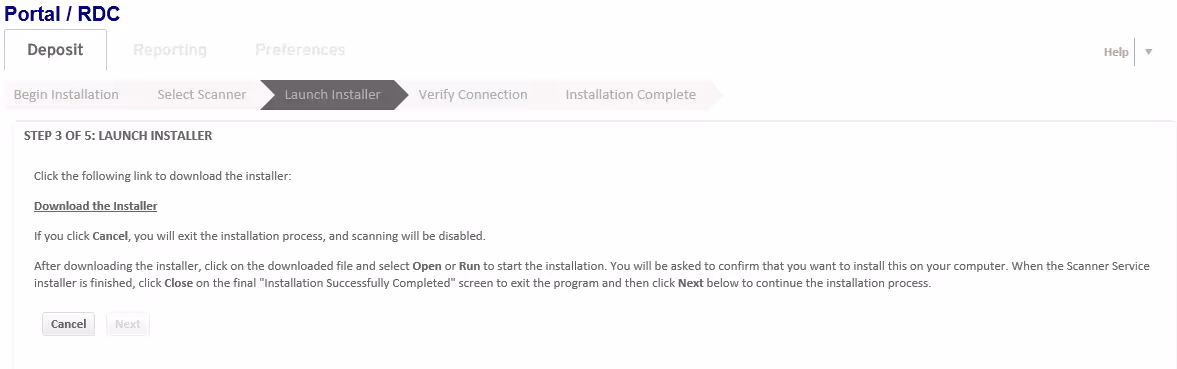

When the installation is successfully completed, close the installer and click “Next” to continue to Step Four.
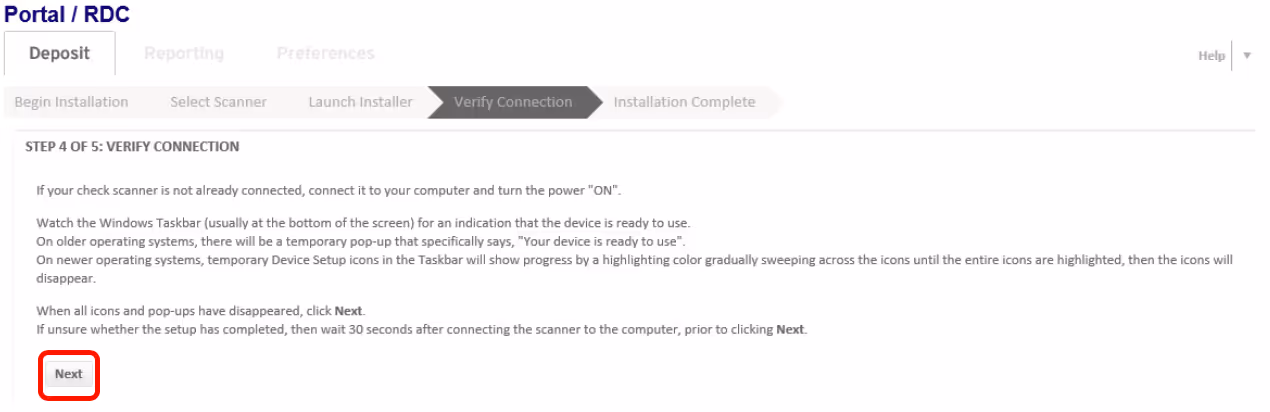
Step Four: Verify Connection.
Connect your scanner and power it on. An indication that the device is ready for use will be displayed in the Task Bar.
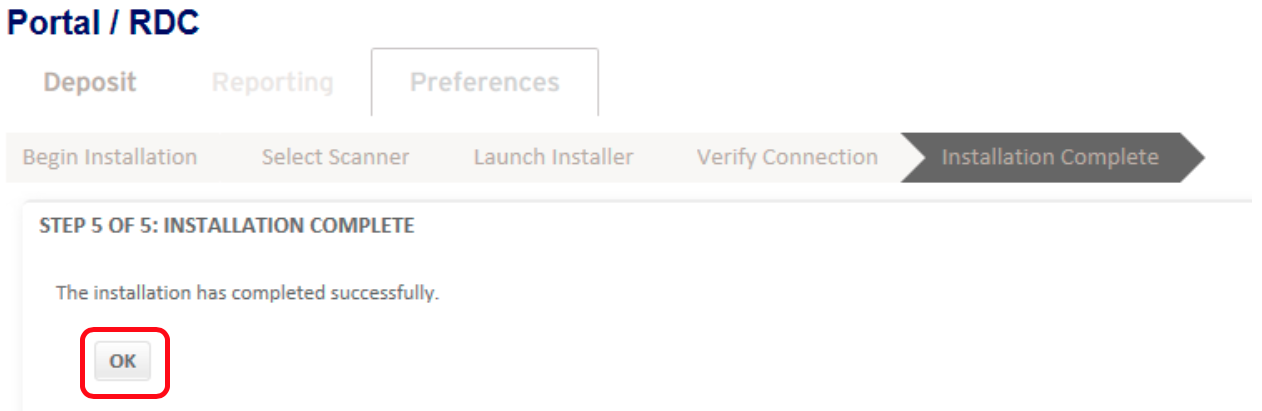
Step Five: Installation Complete.
Click “OK” to begin your deposit.
4.4 Capture Deposits
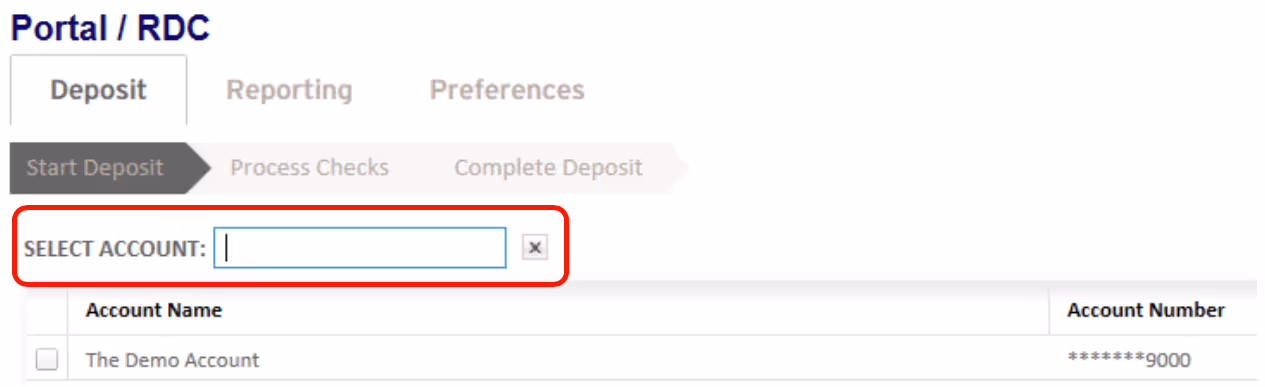
Once you have installed your scanner, you will be able to start your deposit.
4.4.1 Deposit Checks
The first thing you need to do is to select the account you wish to deposit the checks in.
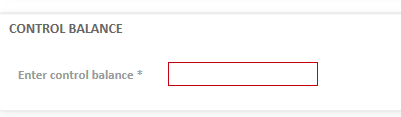
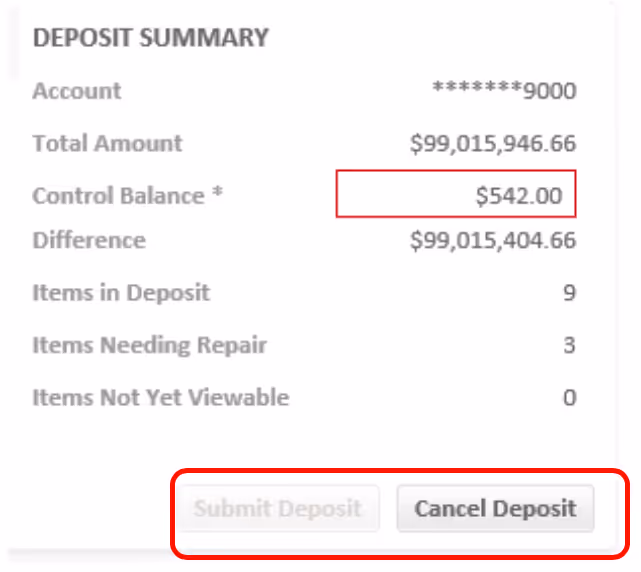
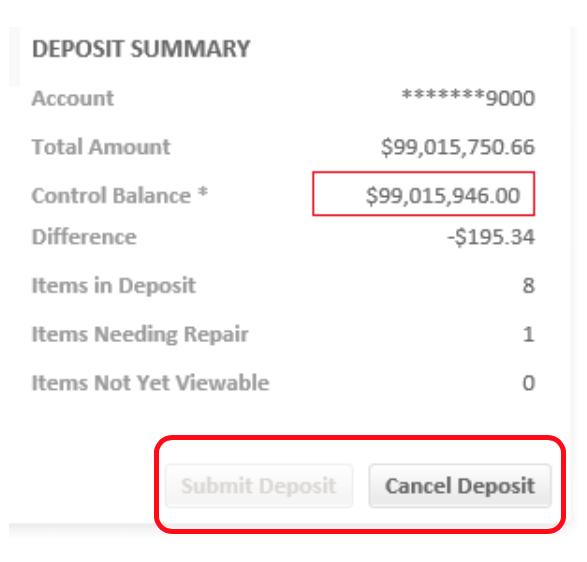
Once you have selected an account, you have to enter the control balance for the deposit which needs to match your deposit total. If the deposit total does not match the control balance you will not be able to submit your deposit. You will be able to adjust the control balance after you scanned your deposit.
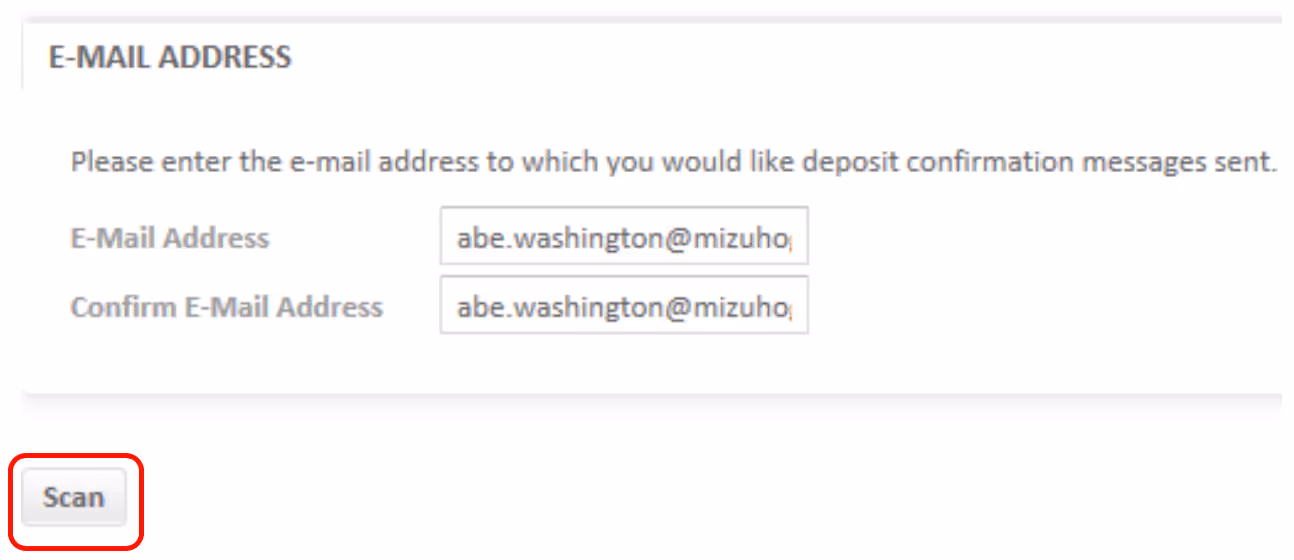
You will be able to enter the email address you would like the deposit confirmation sent to. When you are done, click ”Scan” to begin scanning your deposit.
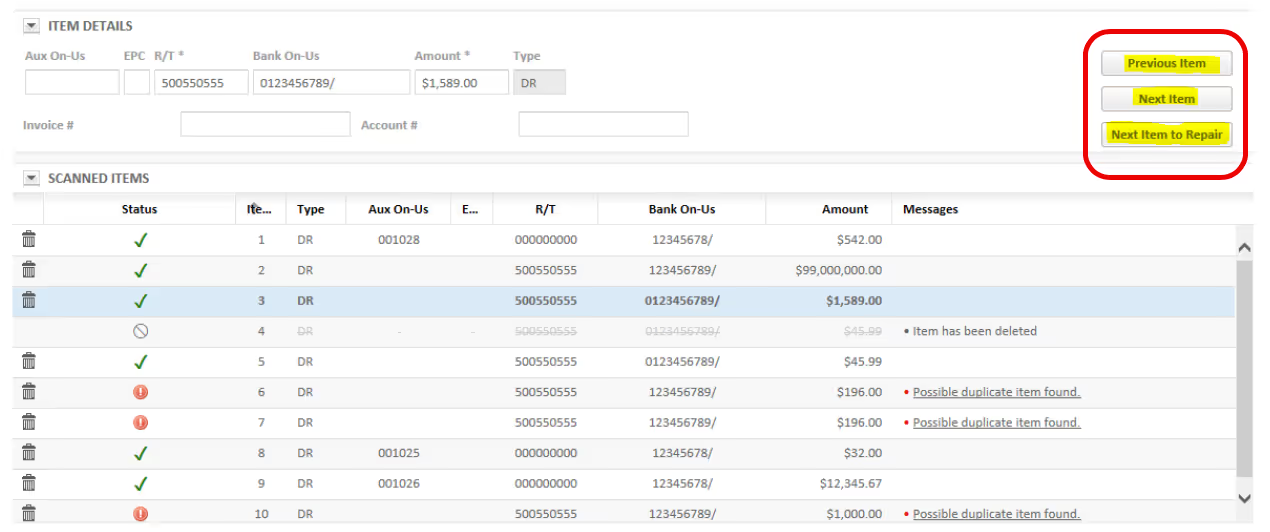
Place your check in the scanner and click “Scan” to begin your deposit. The check details should automatically loaded on screen, such as account number, routing number, check number and amount.
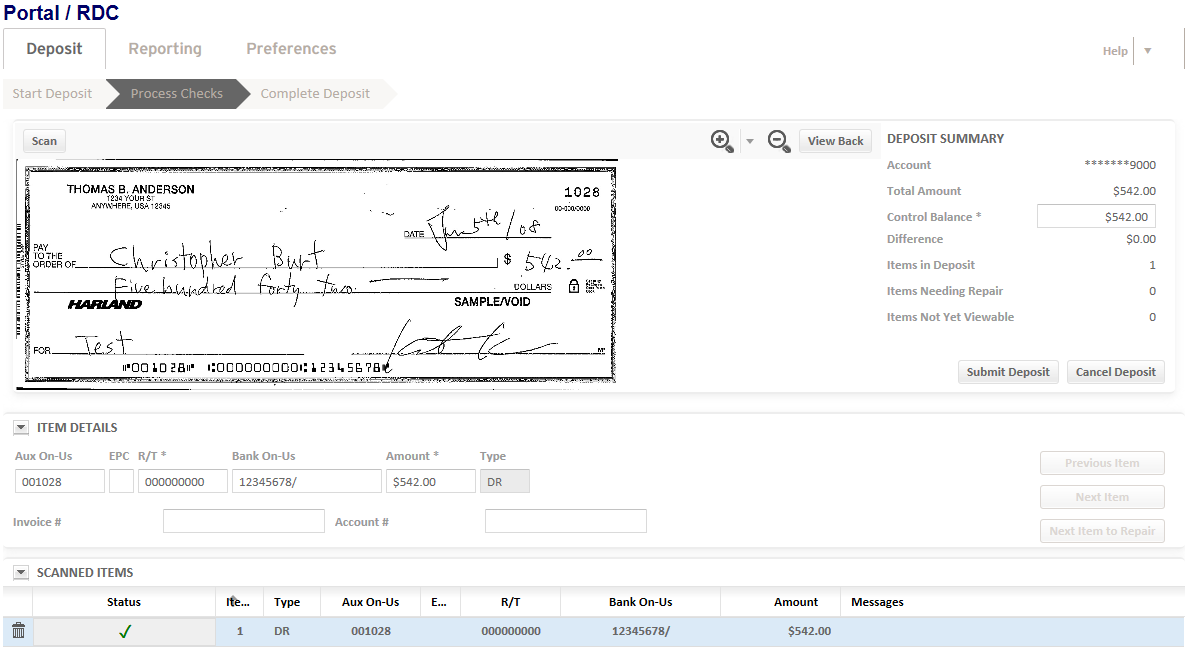
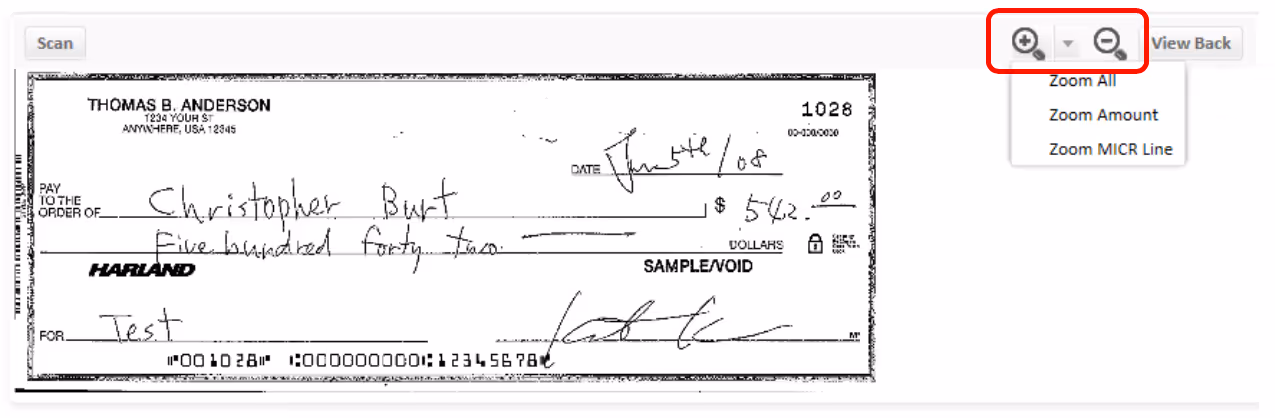
You can view the front and back of the scanned image. You can zoom in and out to get a better view of check details.
From the deposit summary you can view the account that was chosen for the deposit, the total amount of the deposit, your control balance, the number of items in the deposit, and the number of items in need of repair. From here you can submit or cancel your deposit.
The “Previous Item”, “Next Item” and, “Next Item to Repair” buttons are there to help you easily navigate through the scanned item list.
Click the trash can  to the left of an item to delete a check from the deposit.
Items with a  in the status column are ready to be deposited.
Items with an  in the status column are in need of repair.
Items with a  in the status column have been deleted.
If there are any issues with any scanned checks, the check details will be in red and it will identify the issue.
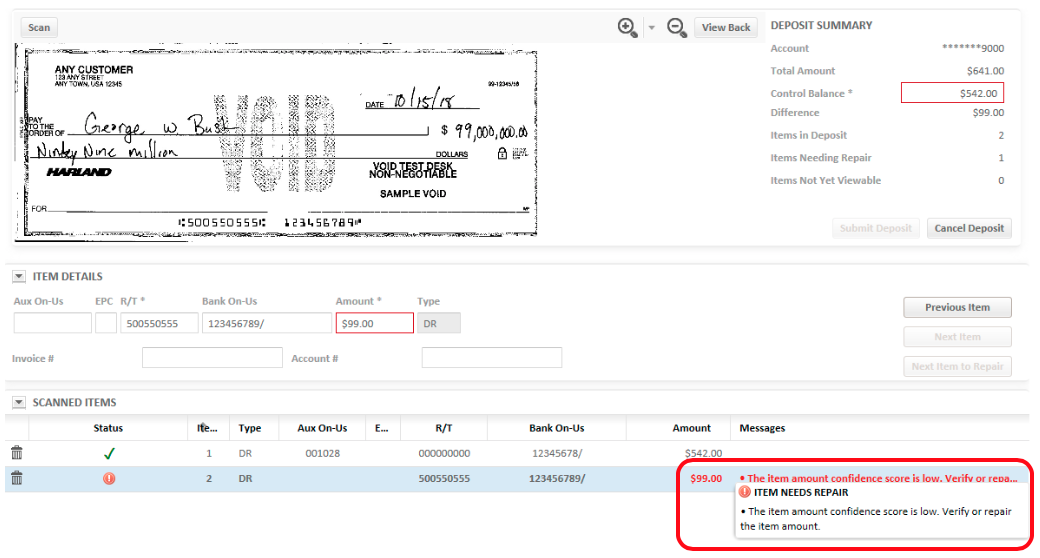
If the scanned amount is incorrect or if the scanner isn’t confident with the amount scanned, you are able to edit the amount.

Duplicate checks will be detected by the system. A message will appear next to the check stating “Possible duplicate item found.”

Click the “Possible duplicate item found” message to see the orginal and possible duplicate side by side. The previous item would appear on top. The possilble duplicate on the bottom.

If you believe the check is a dupilcate of the previous item click “Yes”. If it is not a duplicate check, click “No”. If you click “No”, the item will simply be cleared of the error.

If you click “Yes” the system will prompt you to cancel the item. Click “Yes, Cancel Item” to confirm cancellation, or “No, Keep Item” to keep the item.
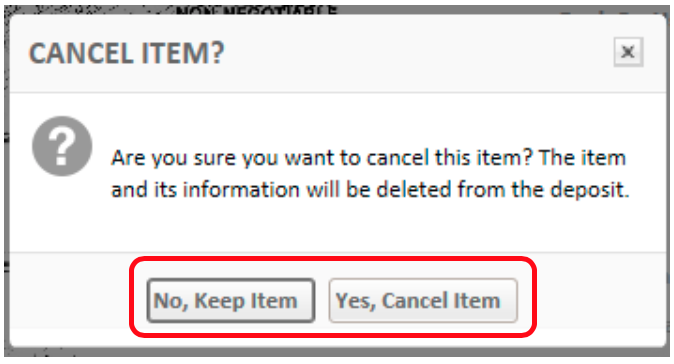
The cancelled item will be removed from the deposit.

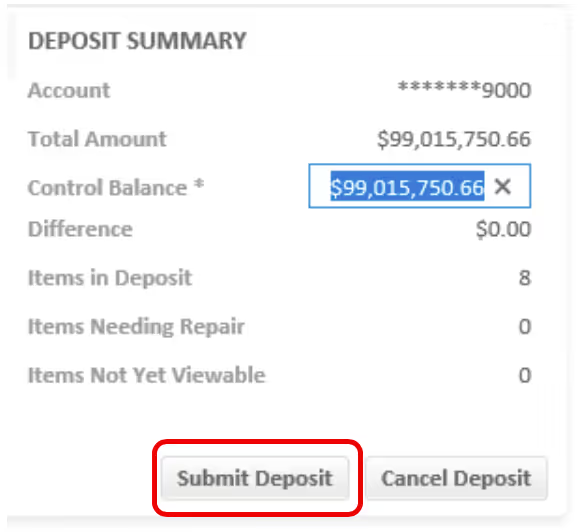
To submit your deposit you must clear all items in need of repair. Your control balance must match your deposit’s total amount. If the deposit total does not match the control balance, or if there are any items in need of repair, you will not be able to submit your deposit. The submit button will be grayed out.
Once the deposit is balanced and there are no more items in need of repair, you can submit your deposit by clicking the “Submit Deposit” button.
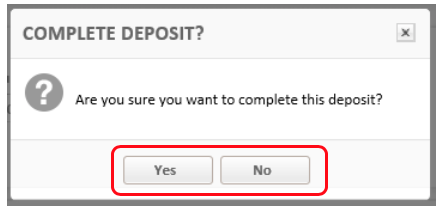
The system will ask “Are you sure you want to complete this deposit?” Click “Yes” to complete the deposit. Click “No” to go back and make any changes needed.
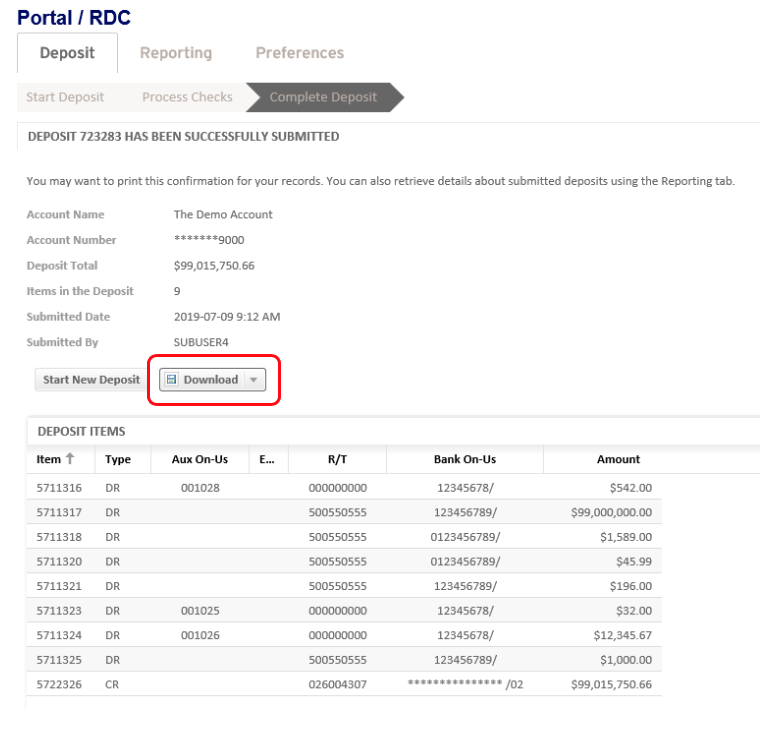
Once you have submitted your deposit you will see a summary of your deposit. From this screen you are able to download a report of your deposit. The report is available in .csv and .pdf format.
4.4.2 Deposit Reports
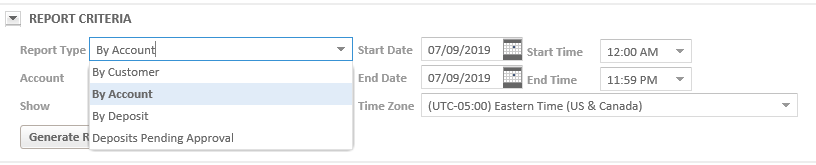
To access RDC reports, click on the “Reporting” tab.
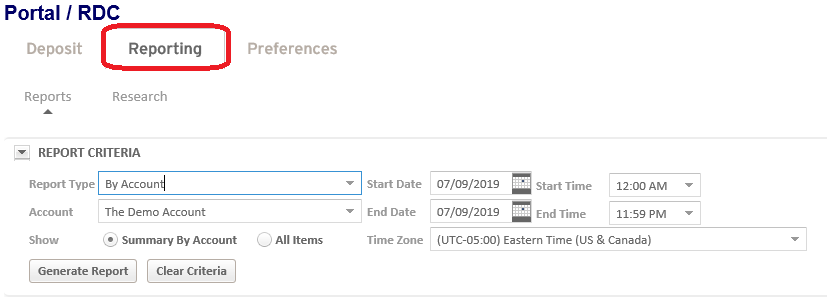
From here you can generate reports by customer, only available in .csv, which will display all deposits in a specified date range. You can generate reports by account, only available in .csv, which will display all deposits to a chosen account in a specified date range. You can generate reports by deposit, available in both .csv and .pdf, which will only display data from a specified deposit.
Deposit data is available for up to 45 days and the check image is available for up to 14 days.
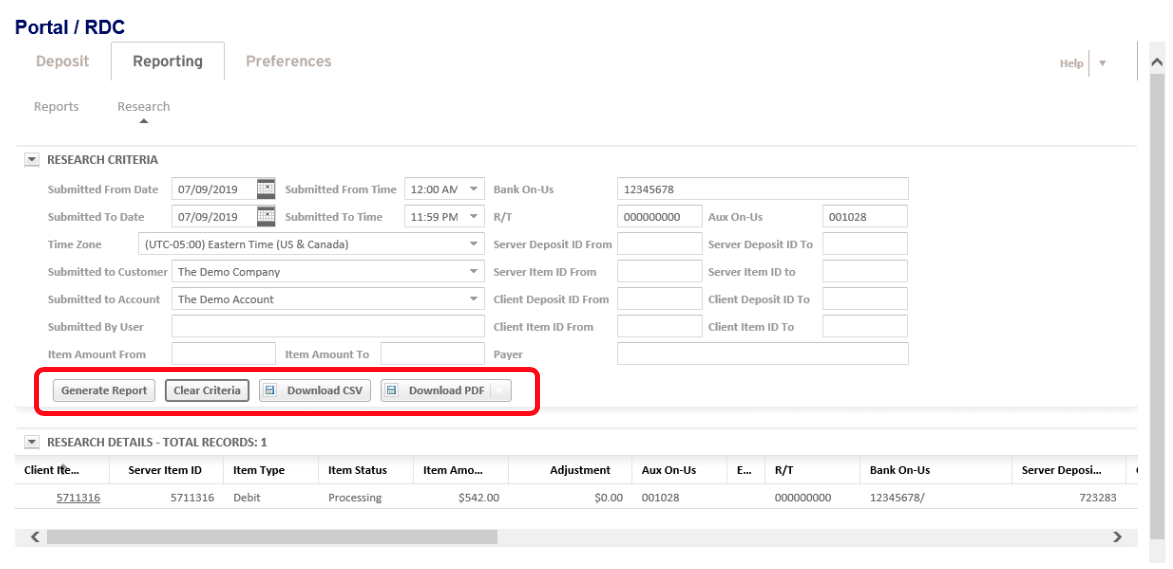
4.4.3 Deposit Research
You can research a specific item using the research tab under reporting. Just enter as much information as you can for the check you are researching and click “Generate Report”. When “Download PDF” is selected, there is an option to print the check image.
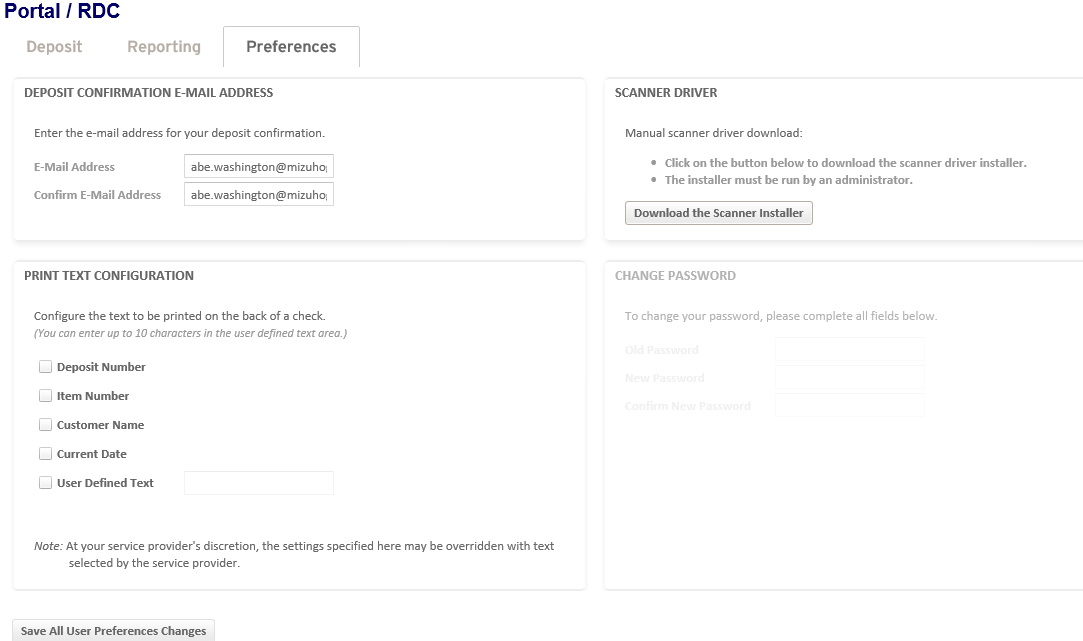
4.5 Preferences
Under the “Preferences” tab you are able to add your email for deposit confirmation. You can configure the text to be printed on the back of a check. You can also launch the scanner driver download from this page.
5. Mobile Banking
5.1 Introduction
5.1.1 Service Overview
Mizuho Global e-Banking Plus mobile application is a user-friendly application that offers the ease and convenience of banking remotely with confidence. Using an Apple mobile device, you can perform the following tasks:
• View and approve positive pay issuance
• Make decisions on suspect items
• Approve decision on suspect items
• Scan and submit deposits via mobile deposit
The Mizuho Global e-Banking Plus mobile app is compatible with iOS version 12 and up on all currently supported iPhone models. Android support will be available in the near future.
5.1.2 Download the Mobile App
To download the application, perform the following steps:
a) In the United States territory Apple App Store, search for the Mizuho mobile application, download it to your device and follow the on-screen installation steps.

Mizuho Global
eBanking Plus
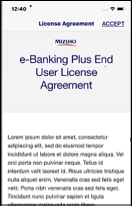
b) After installation, open the application on your device and review the “End User License Agreement” (EULA). This agreement must be accepted in order to register a device. Tap on “Accept” to accept the agreement.
c) After accepting the EULA, you are navigated to the “Register Device” page.
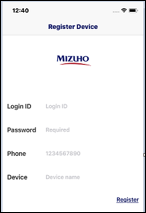
5.1.3 Register your Device
After you accept the EULA, you are navigated to the “Register Device” page.
To register a mobile device, enter the following information and then tap on “Register”.
Login ID: Enter your ID (Unit Code + User ID)
Password: Enter your password for Mizuho Global e-Banking Plus.
(To be instructed by Technical Support Team during training)
Phone: Enter the mobile number that was registered in Mizuho Global e-Banking Plus.
Device: Create a name for your device, for example, “iPhone 13” or “My iPhone”.
5.1.4 Verify with a PIN Code
After successful registration, you are navigated to the “Verify Device” page.
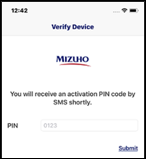
Enter the Activation PIN code that is sent to your email address and tap on “Submit”. The Activation PIN code is valid for a limited time. If the PIN code expires, you need to register again to obtain a new PIN code. Your user ID will be disabled if you enter the wrong PIN code three times. When valid PIN code is entered, you are navigated to the “Welcome” page to log into the application.
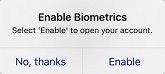
5.1.5 Login and Enable Biometrics Feature
After completing the registration process, the first login page is prompted.
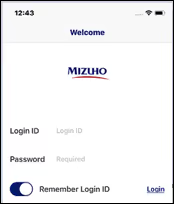
Enter your login ID and password. After first successful login, the application displays the option to enable “Biometrics” security feature for future login.
5.2 Getting Started in Mobile Banking
5.2.1 Dashboard
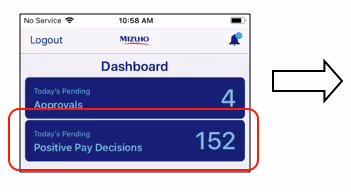
Based on the user’s entitlements, the “Dashboard” displays the “Pending Approvals” and “Decisions” items that await your actions.
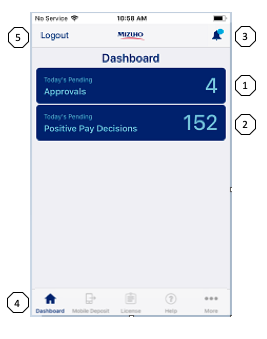
- Today’s Pending Approvals: displays the total number of pending approvals for current day. This number includes both the Positive Pay issued items and decisions items pending approval.
- Today’s Pending Positive Pay Decisions: displays the number of Positive Pay suspect items awaiting “Pay” or “Return” decision
- Alerts and Broadcast Messages: the bell icon on “Dashboard” indicates the arrival of new alerts and bank announcements.
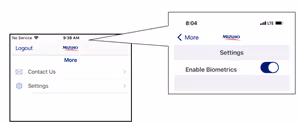
- Menu: takes you to the “Dashboard”, provides links to “License Agreement”, “Online Helps”, “Contact Information” and “Touch ID” sitting under “More”.
- Logout: sign out from the application.
5.2.2 To View Alerts and Broadcast Messages
Tap on the bell icon on the upper right hand corner of the “Dashboard” to access “Announcement” and “Alerts”.
a) To view bank announcements/broadcast messages, tap on the bell icon. The “Notifications” page is displayed. Tap on the “Announcements” tab.
The announcement records (for the configured dates) are displayed
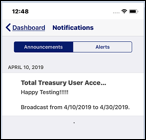
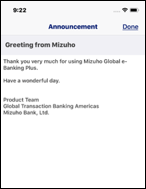
Tap on individual record to view announcement details. If the announcement contains an attachment, you cannot open it in the mobile application. Use the desktop application to view the attachment.
b) To view alerts, tap the bell icon on the “Dashboard”. The “Notifications” page is displayed. Tap the “Alerts” tab.
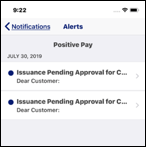
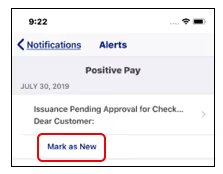
Tap on individual record to view alert details.
The alert will stay visible for 5 business days, then removed by the system.
c) To change the status of an alert to unread, tap the “Mark as New” option from alert record.
Under “More” or “Settings”, you may find the “Contact Us” information and the option to enable biometrics option.
5.3 Positive Pay Service
The Positive Pay mobile service allows you to perform the following tasks:
a) Approve issued items created on desktop application if approval option is selected.
b) Make “Pay” or “Return” decision on a suspect item.
c) Approve decisions submitted by another user if approval option is selected.
5.3.1 Issued Items Approval
This step is required only if you selected issued items approval option. You can approve or reject individual or multiple issued items at once.
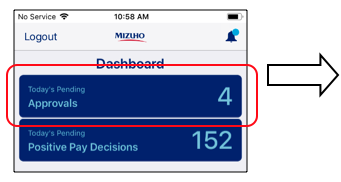
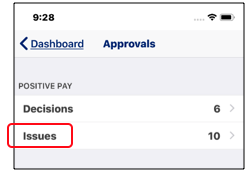
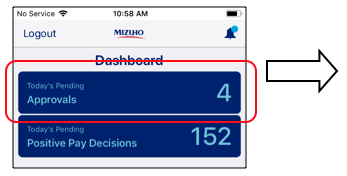
a) Tap on “Today’s Pending Approvals” section on the “Dashboard”. Select “Issuance”.
b) Select single or multiple records to process its approval or rejection. Review the transaction details and then tap either “Approve” or “Reject”.
To approve or reject multiple records, tap “Select” or  on the upper right-hand corner of the phone, mark all the records you want to process. Tap either “Approve” or “Reject” and then tap “Submit”.
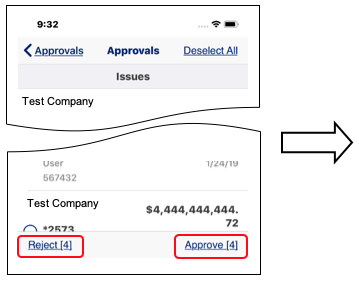

Before submitting records for approval, if you want to remove all selections, tap “Deselect All” to clear selection for all records. Tap “Remove from Selection” to remove individual records.
5.3.2 Suspect Items Decision Making
Customer will receive both email notification and on screen alert when Positive Pay suspect items are detected. Customer is expected to make “Return” or “Pay” decision by cutoff time (11am of next business day). If decision is not made by the cutoff time, default decision will be applied.
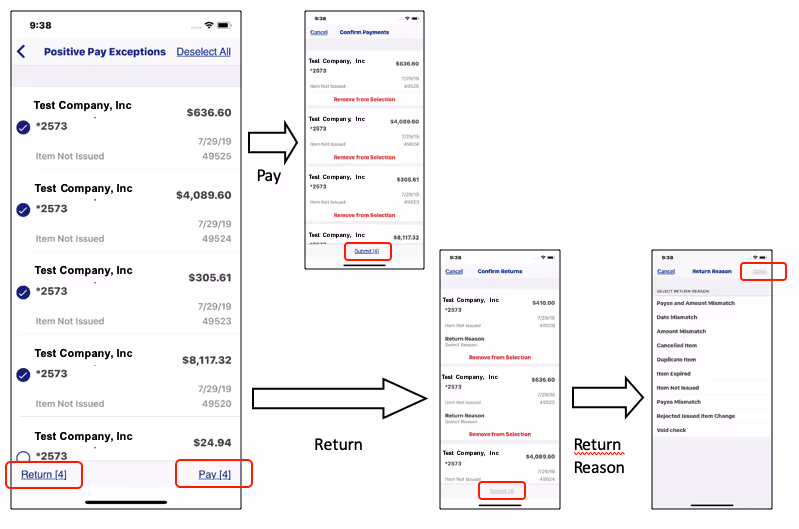
You can make decision for individual or multiple suspect items at once.
a) Tap on “Today’s Pending Positive Pay Decisions” section on the “Dashboard”.
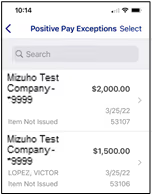
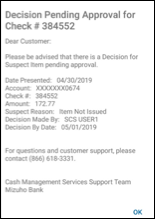
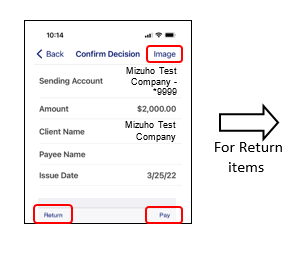
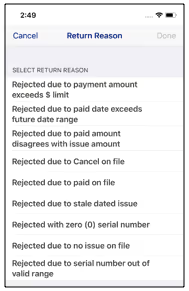
b) Select single or multiple records to make “Pay” or “Return” decision. Review the transaction details, then tap either “Return” or “Pay”. Tap on “Image” to view the check image. If you select “Return”, a “Return Reason” must be indicated.
To make decision for multiple records, tap “Select” or on the upper right-hand corner of the phone, mark all the records you want to process. Tap either “Return” or “Pay”, then tap “Submit”.
5.3.3 Suspect Items Decision Approval
This step is required only if you selected the suspect item decision approval option. You can approve or reject individual or multiple decisions at once.
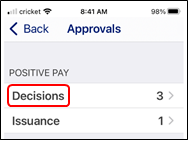
a) Tap on “Today’s Pending Approvals” section on the “Dashboard”. Select “Decisions”.
b) Select single or multiple records to process its approval or rejection. Review the transaction details and then tap either “Approve” or “Reject”.
To approve or reject multiple records, tap “Select” or on the upper right-hand corner of the phone, mark all the records you want to process. Tap either “Approve” or “Reject”, then tap “Submit”.
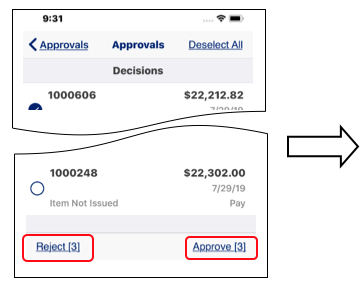
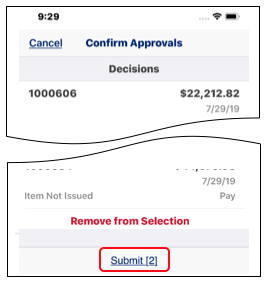
Before submitting records for approval, if you want to remove all selections, tap “Deselect All” to clear selection for all records. Tap “Remove from Selection” to remove individual records.
5.4 Remote Deposit Capture
This feature enables you to capture check images and send them to the bank for posting and clearing using a mobile device.
5.4.1 Access Mobile Deposit Page
From the Home Page, tap on the “Deposit” option, the application displays a list of recent mobile deposits.
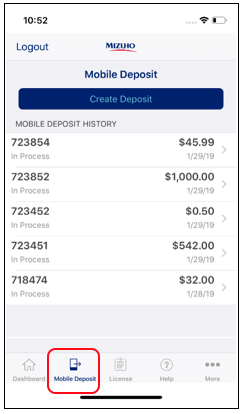
The following information is displayed:
Transaction ID: This is an automatic generated identification number for mobile deposit record.
Status: This is the current status of the mobile deposit:
- In Process: Mobile deposits currently in process.
- Rejected: Mobile deposits rejected by core system.
- Deposited: Mobile deposits that are successfully processed.
Amount: This is the amount deposited.
Date of Deposit: This is the date when mobile deposit is created.
5.4.2 To View Previously Scanned Checks
The “Mobile Deposit Detail” page displays the details of previously deposited record up to 90 days. To view mobile deposit details, tap on the record from the “Mobile Deposit History” page.
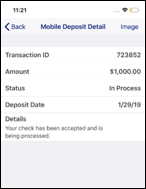
The following information is displayed:
Transaction ID: This is an automatic generated identification number for mobile deposit record.
Amount: Amount deposited.
Status: Status of check deposit.
Deposit Date: Date that check was deposited.
Details: Additional information.
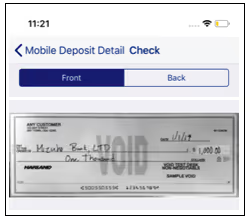
To view check images, tap on the “Image” button located on the upper right hand corner of the phone. You can view front and back images of the check.
5.4.3 Create and Submit Deposit
To create a deposit, tap on “Create Deposit” from the “Mobile Deposit History” page, which will take you to the “Create Mobile Deposit” page.
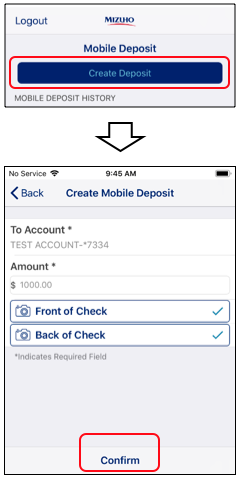
Enter the following required information:
Account: Enter the account number where the funds are to be deposited.
Amount: Enter the deposit amount.
Front of Check: Tap to access the device camera and capture the front image of the check. After capturing the image, tap on “Use” to continue with the captured picture or “Retake” to take another picture.
Back of Check: Tap to access the device camera and capture the back image of the check. After capturing the image, tap on “Use” to continue with the captured picture or “Retake” to take another picture.
Tap on “Confirm”, the application will validate the information, based on the size and quality of captured image. If any of the validations fail, the system generates the appropriate error message. See “Section 5.6 Possible Error Messages for Deposit”.
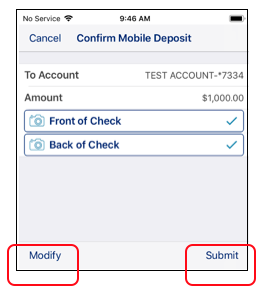
If all the validations pass, the “Confirm Mobile Deposit” page is displayed to review and submit the deposit. Tap on “Modify” to modify any field value or tap on “Submit” to send the deposit to the bank.
To create another Mobile Deposit, tap on “Create Deposit” again from the “Mobile Deposit History” screen.
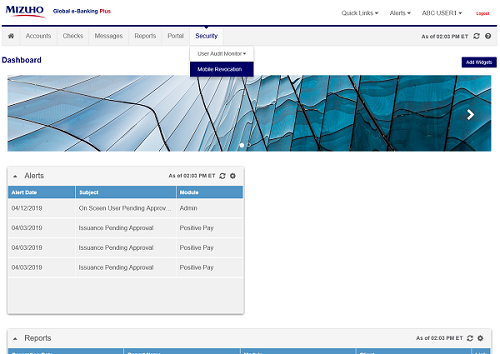
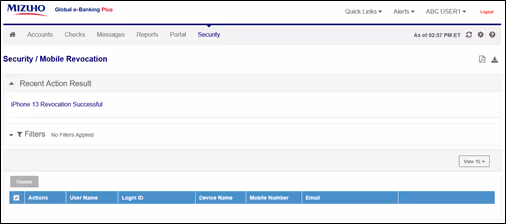
5.5 Revoke a Mobile Device
This feature allows user to revoke the service access for a mobile device. Once the access is revoked, user will be required to follow the initial sign on steps (Section 5.1.3) to register the device for service again. This feature can be used when a mobile device is misplaced or an active user is reassigned or terminated from the company.
This feature is located on your Mizuho Global e-Banking Plus home screen.
Click on “Security”, then select “Mobile Revocation”.
For the device you would like to revoke, click on the “Select” button at the front, then select “Revoke”.
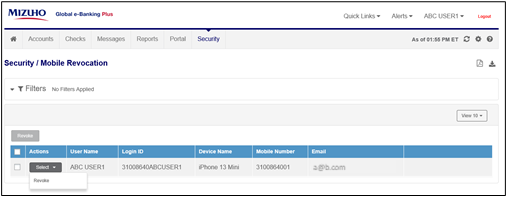
A confirmation box will appear. Click on “Revoke” or “Cancel” to proceed or cancel the revocation for the device.
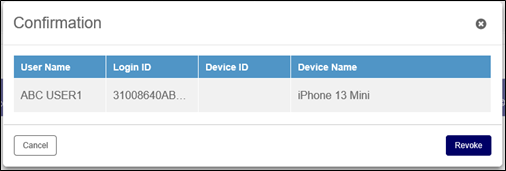
Message is displayed on top of the screen to show the revocation result.
Once the device is revoked, when device owner tries to access the service again, the following messages will be displayed on the device depends on the screen the user was accessing at the time.
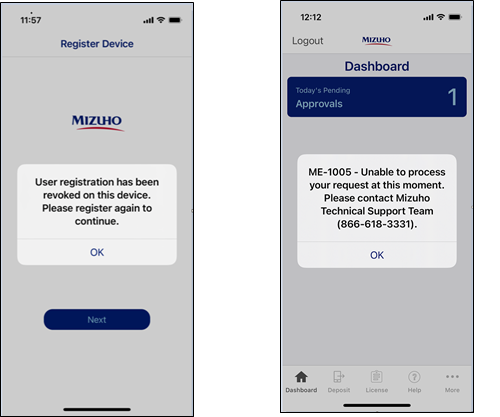
The device can be registered again following the steps in Section 5.1.3 Register Your Device.
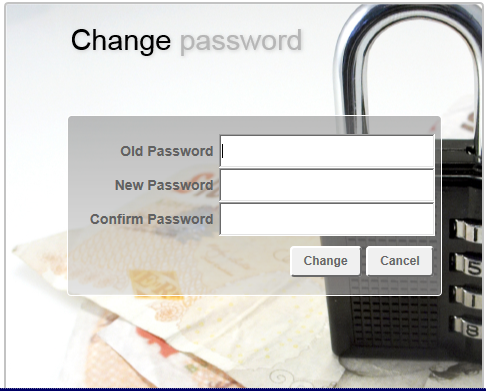
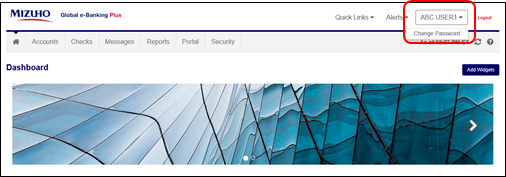
5.6 Change your Mobile Password
The mobile password can be changed using the desktop Change Password function. Please be advised that this password is only used for your mobile device. The Global e-Banking password will remain the same.
a) Access your Global e-Banking Plus Dashboard.
b) Click on your User ID, then select “Change Password”.
c) The following screen will appear and prompt you to enter the existing password and the new password twice.
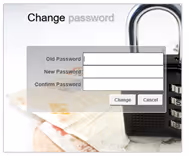
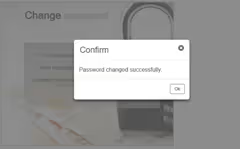
d) The following message will appear once the new password is accepted.
5.7 Possible Error Messages
6. Trade Confirmation
6.1 Introduction
The Mizuho Global e-Banking Plus Trade Confirmation service allows the customers to confirm their Foreign Exchange and Time Deposit transactions via the Mizuho Global e-Banking service.
Benefits of using Trade Confirmation Service includes:
• Elimination of paper confirmation.
• Automated Email alert.
• Print confirmation at your convenience.
• Ability to search for both outstanding and matured trades.
• Ability to manage trades on the same day.
6.2 How Trade Confirmation Works
Steps of Trade Confirmation process:
1. After the deal is executed, customer will receive an automated email alert to notify them of a confirmation pending for their review. The customer will log into the Mizuho Global e-Banking website for Mizuho Global e-Banking Plus Trade Confirmation services.
2. Once you reach the “Trade Confirmation” portal, customer can access the outstanding confirmations in the “Unconfirmed” queue and verify the following trade information:
• Amount
• Buyer/Seller
• Value Date
• Maturity Date
• Rate
• Deal Date
3. If all the details are correct, the customer may confirm the trade. If there are any discrepancies, customer may submit a query to Mizuho Bank with trade details in question. Mizuho Bank will respond within a reasonable time frame for each query.
Note: The Customer can contact the Treasury Administration Unit by telephone at (201) 626-9967 or email at TradeConfirmation@mizuhogroup.com.
4. Once the trade is confirmed, it will be categorized under the “Confirmed” queue.
5. Confirmation in question (queried) can either be confirmed by the customer or cancelled by the Bank.
6.3 How to Access Trade Confirmation
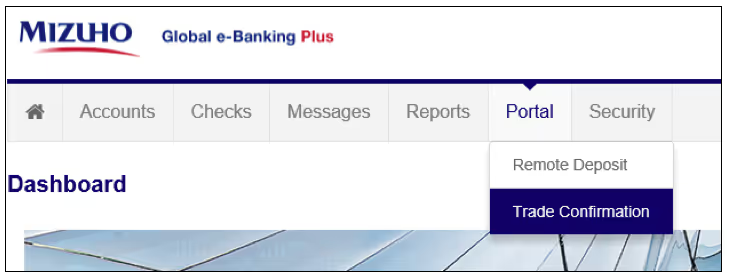
Once you have logged into Global e-Banking Plus, hover over the “Portal” tab, then click on “Trade Confirmation” to access Trade Confirmation service. Please refer to “Mizuho Global e-Banking Plus Customer Manual (Introduction and Getting Started)” for login instruction.
6.4 Getting Started with Trade Confirmation
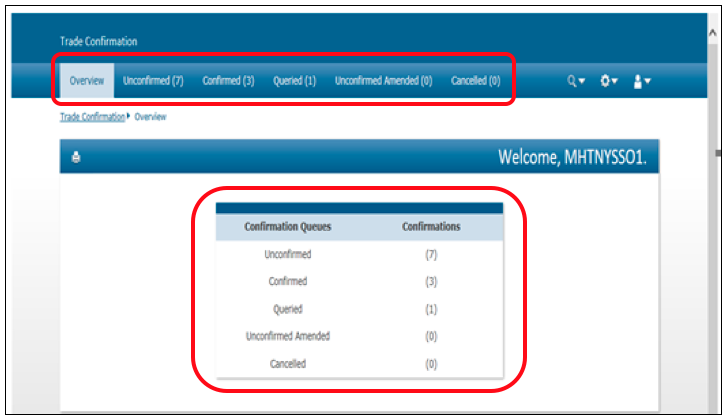
6.4.1 Trade Confirmation Overview Screen
The Overview screen provides the customer with a summary of each queue. The customer has an option to either select the tabs at the top (blue board) or select the queues listed under the Confirmation Queues header.
6.4.2 Trade Confirmation Register for E-mail Alerts
Email alerts are generated automatically to advise the customer of a new trade pending confirmation. The alerts are automated thru the Bank’s system after a deal is processed. Each alert advises the customer of the arrival of a confirmation in the “Unconfirmed” queue.
From the Overview Screen, click on the circular icon highlighted in the screen below to access e-Mail Alerts.

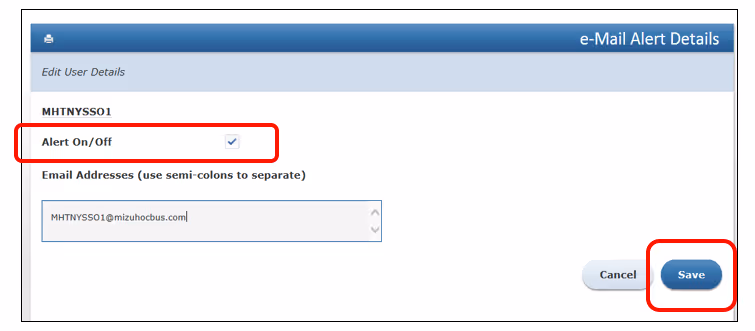
You will be presented with the following screen for Email Alert. Click on user ID to modify the alert preferences.
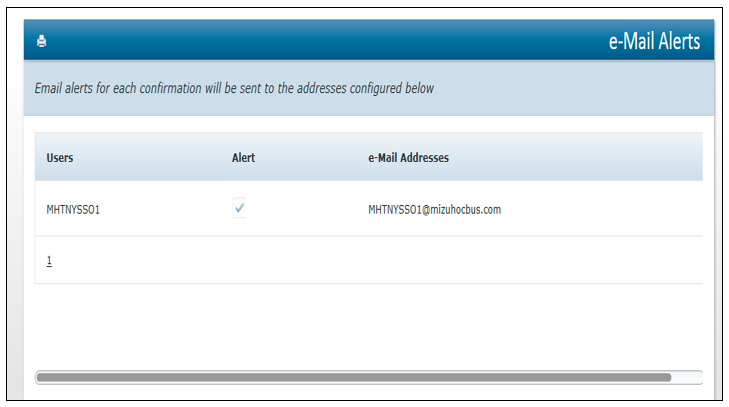
The Customer can register additional email addresses, separated by semi-colons. Check the select box for “Alert On/Off” (see screen below). The system will automatically send emails to customers who have checked the box next to “Alert On/Off” and a valid email address. An email is sent for each trade that is executed with the Bank.
Note: It is important for the customer to register their email address to receive the automated E-mail alerts and update any changes to the register E-mail address(es). If a customer chooses not to register for E-mail alerts, they will need to monitor “Unconfirmed queue” in Trade Confirmation.
Click on the “Save” button once the information is completed.
Important: Customer must log into Mizuho Global e-Banking Plus Trade Confirmation service in order to confirm or take other action with respect to trade executed in a timely manner.
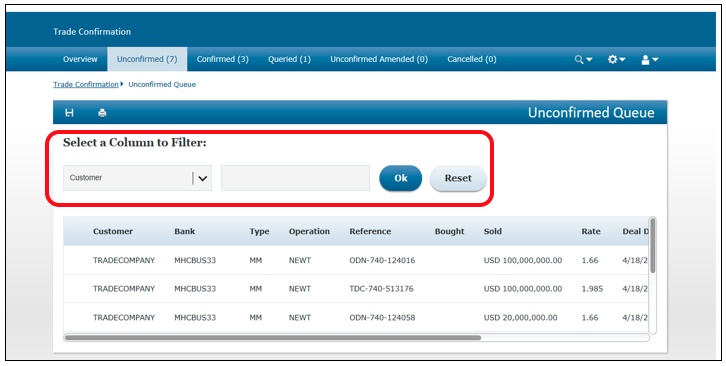
6.5 Trade Confirmation Unconfirmed Queue
Click on “Unconfirmed” tab to access the list of unconfirmed trades. The list includes overnight and long term trades which are sorted in deal date order by default. Click on a trade from the list to display the financial details on screen. Once the details have been reviewed, the customer has an option to either “Confirm” or “Query” the trade. If an overnight trade or future trade is not confirmed by the customer, then the system will automatically remove the “Unconfirmed” confirmation one day after the maturity date. These trades cannot be viewed by the customer since the Bank processed them. The customer can contact the Bank for a pdf file of the confirmation.
Note: The sorting order can be changed by clicking on the header column. You can also use “Select a Column to Filter” to select the trades to display on screen. These features can be used in the “Confirmed”, “Queried” and “Cancelled” queue screens.
6.5.1 To Confirm a Trade
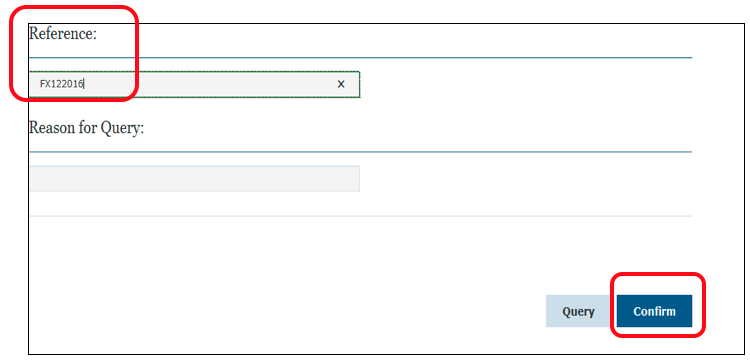
If the customer agrees with the financial details of the trade, they must enter a reference number in the “Reference” field before clicking the “Confirm” button. The system will not allow the trade to be confirmed without a reference number in the “Reference” field.
Notes: Once “Confirm” is clicked, the “Confirmed” queue count will increase by one and the “Unconfirmed” queue count will decrease by one.
6.5.2 To Send a Query to Bank
If the customer does not agree with the financial details provided by the bank, the customer may enter the reference number and the reason for discrepancy (e.g., incorrect amount) in the “Reason for Query” field. The reason must be indicated for the Bank to take immediate action to investigate the discrepancy. Click on “Query” after all necessary information is entered.

Note: Once “Query” is clicked, the “Queried” queue count will increase by one and the “Unconfirmed” queue count will decrease by one.
6.6 Trade Confirmation Amended/Unconfirmed Queue
This function is not utilized by Mizuho.
6.7 Trade Confirmation Cancelled Queue
Click on “Cancelled” tab to access cancelled confirmations executed by the Bank. This queue does not provide Customer with the options to “Confirm” or “Query”. The customer will select the “Acknowledge” button to confirm the cancellation. When a cancellation is “Acknowledged”, the confirmation is moved to the “Confirmed” queue with updated status.
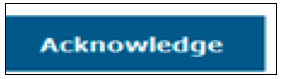
Note: Once “Acknowledge” is clicked, the “Cancelled” queue count will decrease by one and the “Confirmed” queue will increase by one.
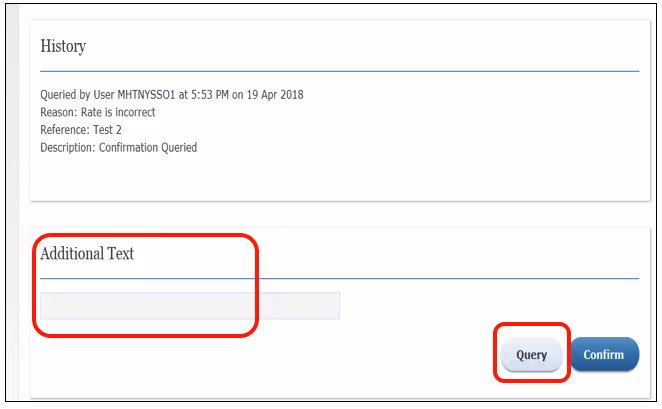
6.8 Trade Confirmation Query Queue
Clicked on ‘Queried” tab to access the confirmations that have been queried by the customer for various discrepancies (incorrect rate, amount difference or value date difference). The “History” field located at the bottom provides the Customer with reason and who queried the confirmation. The customer can include further information if needed under the “Additional Text” field and select the “Query” button.
A confirmation will remain in this queue until the discrepancy has been resolved by both parties. The customer will subsequently confirm the trade, or the Bank will cancel its version of the confirmation, thereby removing it from the “Queried” queue to the “Cancelled” queue. If corrections were made on a trade, a new confirmation will be sent to the “Unconfirmed” queue with the correct details.
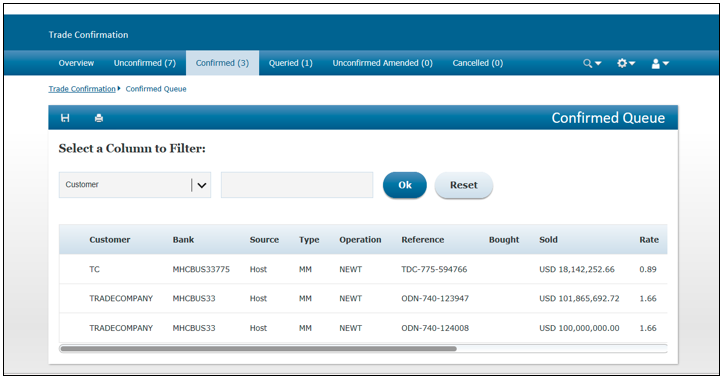
6.9 Trade Confirmation Confirmed queue.
Click on “Confirmed” tab to access the list of confirmed trades. Use the “Select a Column to Filter” function to search for a confirmation that has been processed. Click on individual trade to view the financial details.
6.10 Trade Confirmation Search function.
The customer can use the “Search” function to locate confirmations according to specific trade criteria. Customer may search for trades that are currently active (i.e. they have not yet matured) or matured trades that have been moved to the archive file.
To search for confirmations that have matured, click on “Search Archives” checkbox.

The application retains up to two years of trade confirmation historical data. The customer would need to contact the bank for confirmations two years or older.
Click on the  to access the search function. The search can be conducted by using one or more of the following criteria. The displayed result depends on the trade type chosen.
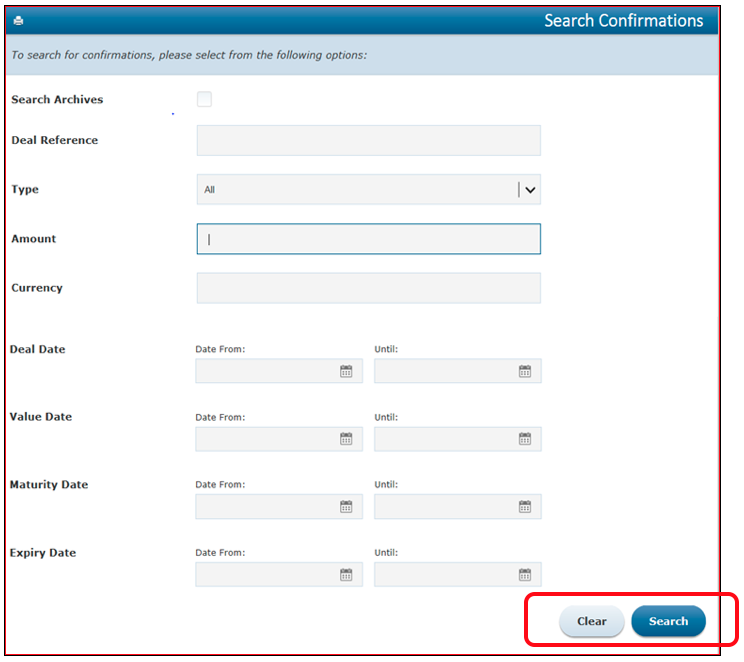
Searching Options:
Search Archives: Option to include matured trade confirmation
Deal Reference: Enter reference number
Type: Select Foreign Exchange or Money Market
Amount: Enter the amount of the trade
Currency: Enter the currency of the trade
Deal Date: Enter the deal date
Value Date: Enter the value date for the trade
Maturity Date: Enter the maturity date for the trade
Expiry Date: Enter the expiry date
Click on “Search” to initiate the search, or “Clear” to erase all searching criteria and start over again.
6.11 Trade Confirmation Excel Download
Trade Confirmation allows customer to download either a list of confirmations with a particular status or the full details of a single confirmation in Excel spreadsheet format (.xls) document. This is done by clicking on the Excel download button to the left of the Print icon (see icon below).

6.12 Trade Confirmation Print
Confirmations can be printed by clicking on the print link located on screen (see icon below).